Outsmarting the LMS: Download Links for Google Docs

As I have stated before, embedding a Google Doc in your LMS is infinitely more efficient than yo-yoing documents up and down from the server every time you must edit the document. You paste the embed code one time, make a couple of minor modifications, and every edit from that point on is made directly to the Google Doc. It really is that simple. The main downside to this method is that students have a hard time printing the document. Remember printing? Paper? That strange material formed from mushed up trees that can tear, slice your finger and never seems to run out of battery? Yes, many students still like to use it, and unfortunately the method I described in my previous post does not lend itself to printing at all. In fact, it is quite frustrating for the students, not to mention wasteful. Basically, your browser will print the entire web page as it displays on the screen, not just the document.

So, how does an instructor address this? Well, you could always upload a PDF or Word version of the document to the LMS that students can download and print. But wait? Doesn't that put you back in the same dilemma of uploading a new version of the document every time you make a change to the Google Doc. That actually seems like DOUBLE the amount of work!

Wouldn't it be great if you could create a link for students that lets them download the most recent version of the document in a format that is easy to print? Thankfully it is possible, and I will show you how.

Step 1: Locate the Document ID

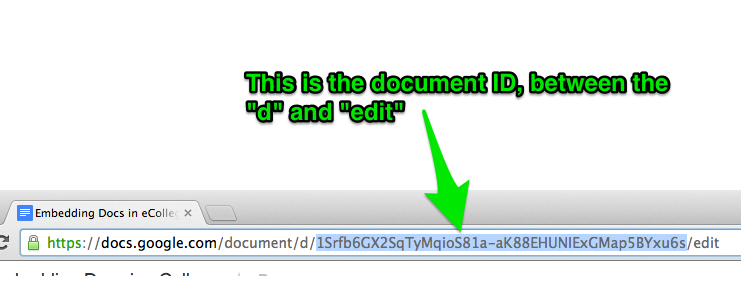
Each file hosted in Google Drive is given a unique (ungodly) ID, which can be found in the URL of the file. See the example below:

Embedding_Docs_in_eCollege_-_Google_Drive-9

Step 2: Create a download link on the document

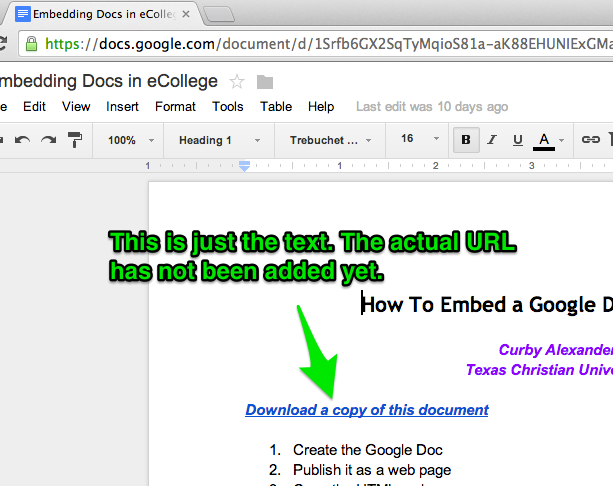
You will need to create a link on the document that students can click to download a print-friendly version. I put the link at the top of the document because students ... well, many of them aren't fond of scrolling. Here is an example of the download link. I tend to type the text first, then I add the URL next.

Embedding_Docs_in_eCollege_-_Google_Drive-5

Step 3: Add download URL to the link

Now that you have a link for students to click, you need to add a URL that will prompt the browser to download the most recent version of the document. This URL will vary based on the type of Google file you are working with (e.g., spreadsheet, document, drawing, presentation). The code for each type of URL is below:

  • Google Document : https://docs.google.com/document/d/[FILE_ID]/export?format=[FORMAT]
    • FORMAT : docx, odt, rtf, pdf, txt, html
  • Google Presentation : https://docs.google.com/presentation/d/[FILE_ID]/export?format=[FORMAT] 
    • FORMAT : pptx, pdf, svg, png, jpg
  • Google Drawings : https://docs.google.com/drawings/d/[FILE_ID]/export?format=[FORMAT]
    • FORMAT : pdf, svg, png, jpg

You will modify the text in bold to fit your particular situation. For example, if I want students to download a PDF of my example document, the URL would be:

  • https://docs.google.com/document/d/1Srfb6GX2SqTyMqioS81a-aK88EHUNIExGMap5BYxu6s/export?format=pdf

In case you are new to this, here is how you add the URL to the download link you created:

Embedding_Docs_in_eCollege_-_Google_Drive-15


This may seem like a lot of steps, but it is pretty easy once you have done a couple of them. As always, you only have to do this once for every document, and the link the link and document ID will stay the same. Let me know if you have any other helpful tricks for embedding Google Docs in your LMS, and happy coding!

Outsmarting the LMS: Embedding Google Docs

I generally love all things Web-related: social media, digital media, coding, learning management systems. You name it. But there are two things I absolutely hate and will avoid whenever possible. Uploading and logging in. I hate them both. They use up valuable time. They're obnoxious. So, I'm left with two options. I can either bite the bullet and just put up with both of those feudal tasks, or I can find a way around it.

Obviously, I chose the second option.

I have been doing this for a few years now, and it really has saved me a lot of time and frustration. This is why I would like to pass on the golden nugget known as embedding Google Docs in your LMS.

Step One: Convert to Google Docs

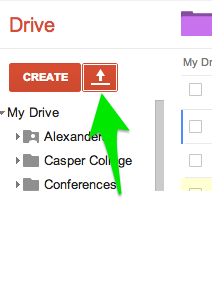
Before you can embed a Google Doc in your course shell, you have to have a Google Doc to embed. Most of the docs I  use in my class (e.g., assignment descriptions, syllabi, tutorials and FAQs) originally existed as Word docs. Google makes it really easy to convert Word docs into Google Docs. You simply to go your Google Drive, click upload, and choose to convert the document (see below)

TCU_Shared_-_Google_Drive

TCU_Shared_-_Google_Drive

In the event you want to create a Google Doc from scratch, you can read this help document directly from Google. They've already done the work so I don't have to!

Step 2: Grab the Code

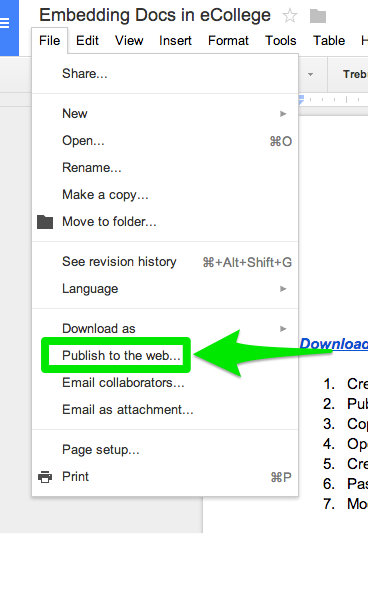
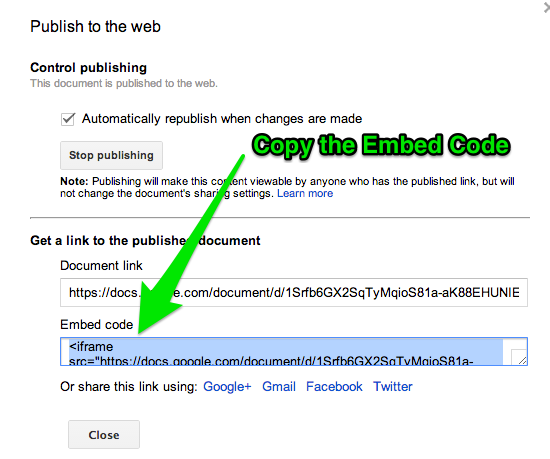
After you have created your Google Doc, you will need to grab the HTML code to add to eCollege. You can see this process in the images below:

Embedding_Docs_in_eCollege_-_Google_Drive-5 Embedding_Docs_in_eCollege_-_Google_Drive-2 Embedding_Docs_in_eCollege_-_Google_Drive-5 2

Step 3: Paste and Modify the Code

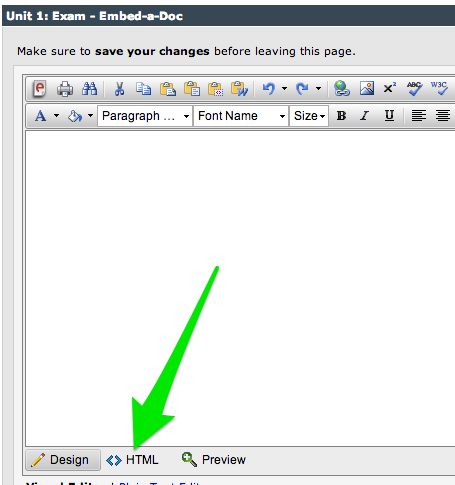
Now that you have the code in your clipboard, you need to go to the page in your LMS where you want to embed the Google Doc. The following screenshots are taken in eCollege, but there is probably a similar feature in all LMS products.

Student_Teaching_Mid_School_742__Alexander_-3

Student_Teaching_Mid_School_742__Alexander_-3 2

Student_Teaching_Mid_School_742__Alexander_

Notice the extra code I added to the original iFrame code in order to make sure the entire document displays in the LMS. If you do not add the width and height code, it will show up as a small box on the LMS page you created. The width should always be 100%, but the height may vary to ensure the whole document will fit in the frame without extra scrolling.  The end result looks like this below:

Student_Teaching_Mid_School_742__Alexander__and_Embedding_Docs_in_eCollege_-_Google_Drive-4

The beauty of this technique is that when I make a change to the Google Doc, it immediately shows up in eCollege! No uploading and replacing old documents each semester. When I copy my course shell each semester, the HTML is still there so I only have to modify the original Google Doc. I don't think I will ever go back! So, give this a try and see how it works for you. You can also watch an archive of this Google Hangout where I showed this technique to some colleagues. Good luck!

Outsmarting the LMS: Creating Drag and Drop Folders

Update! Since posting this several months ago, Google has disabled embedding a Google Site. It's nice to know my Technology Ninja skills are being noticed (which is the exact opposite of what a ninja actually wants to do). I will leave this tutorial in case Google decides to start playing nice again.

Software developers must have a really distorted view of how professors use their time. Maybe they think we teach a few times per week and spend the rest of our time playing golf or drinking coffee while we complain about students. Maybe they think we enjoy spending hours each semester staring at progress bars while our files upload. Who knows. What I do know is that over the last 10+ years in higher education, I have developed a love/hate relationship with every LMS I have been forced to use. I love them because it is the best way to communicate with my students. When they want to know something, this is where they look first. I can post grades quickly, give feedback on their work, and create a safe place to share information.

I also hate the LMS because most of them are outdated, not very attractive (though that is not really such a big deal), and require redundant work from semester to semester. My goal the last few years has been to outsmart the LMS and find ways to work efficiently despite its limitations. I will spread these ideas out over several posts, which may take me several weeks to work through. The first topic I would like to address is creating drag-n-drop folders for documents and other media.

Step One: Creating Folders in Google Drive

The first step is to download and install the Google Drive desktop app. This is a pretty easy step, and the program runs unnoticeably on your computer. Once you have this installed, it will sync your Google Drive from the cloud to your computer. Anything you create from the computer (folders, files, etc.) will also be instantly synced to the cloud. I like to stay organized, so I created folders for each class, and then created folders within each class folder for the different things I would be sharing with students. This includes assigned readings, PPT files, assignment descriptions, etc. I already had some of my files ready for the new semester, so I copied them into the appropriate folders.

Step Two: Embed Folders into Google Sites

This is the step that might be a deal breaker for some people. As you may know, you can share a Google Drive folder with anyone with the link, which is a pretty handy feature when you want to share a bunch of stuff that might exceed the e-mail attachment limit. Unfortunately, Google has blocked the folder view in Drive from being embedded using the iframe tag in HTML. If you do this, you will be met with a blank box in the middle of your webpage. The only way to embed dynamic content from a Google Drive folder is to embed it in a Google Sites page. Sites has a widget for embedding an entire folder. So, for every folder you want to share with students, you will have to create a webpage for that folder. In order to keep myself organized, I structured the Google Site exactly like the folders in Google Drive. For example, I created a page for each class, then I made a page under that page for each folder I want to share. This took some time, but I should only have to do this once. I can always make more pages and folders, but the basic structure is there.

Step Three: Embed the Google Sites Pages

The final step is pretty straight forward. You do not need to know a lot of HTML to embed the Google Sites pages into your LMS. My institution uses Pearson LearningStudio, which allows me to directly edit the HTML. First, I created a tab, or Unit as they call it, for each folder. I then used the following code to embed the webpage on that tab:

<iframe src="http://www.somepage.com" width="100%" height="1000"></iframe>

You may need to adjust the settings of your Google Sites page so the embedded folder will stand out, but that is an easy fix. It should look something like this:

Crit_Investgatn_Teach_Learning_040__Alexander_

The beauty of this system is two-fold. First, any time I want to add or delete files from a folder, I just do it from the Google Drive folder on my computer and the changes are immediately synced anywhere the folder is embedded. I can also edit files and the changes are immediately synced. Second, this code is preserved anytime I copy a course to a new semester. So, I only have to do this once and all of my content follows.

What hacks have you come up with to make the LMS easier to deal with? I would love to hear your ideas.