

Sending students immediate feedback with Google Forms
/I have been a huge fan of Google Forms for quite a few years. I have used it for everything from collecting survey data, to getting feedback on a course, to polling students during a class. For me, it has become a necessity in the way I teach my classes. A couple of years ago, I began giving my students short, specific assessments over the assigned readings each week. Students would read an assigned article or chapter, complete some questions pertaining to the reading through a Google Form, and I would give their response a score. This system has worked well for me, but one complaint I have heard from students is that they do not have access to their responses once they hit Submit. My solution (which is really just a work-around) was for them to write their answers in Word first, then copy and paste them into the form field. I would admit to the students this was not ideal, but it was the only option. With a class of 100 students, I did not want to have to send the students their responses one by one. This constraint of Google Forms made it seem a little clunky for what I was doing.
That is, until I found out about formMule. The add-on for Google Sheets has been a major time-saver for me, and it has been great for the students as well. In short, I have been able to use formMule to send students a copy of their responses immediately after they submit them to me. The responses are not automatically graded, but the students at least get immediate feedback about whether or not their answers made it into the spreadsheet.
Disclaimer: I am going to assume a person already knows how to create a Google Form, which sends responses to a Google Sheet. This tutorial will not include an explanation about how to set up either of those tools.
Step one: Install the formMule add-on for Google Sheets
This is really the easy part. If you have already installed add-ons, then this process is already familiar to you. One nice feature of the add-ons is that once you install it on one sheet, it will be available for all sheets you have created.
Screen Shot 2016-03-06 at 3.59.47 PM
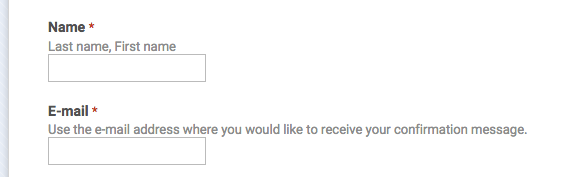
Step two: Make sure your form is asking the right questions
If you want to send your students a copy of the answers they just submitted, you must have an address to send them to. This may seem like a simple thing, but you must make sure you have a field in your form for the students to input their e-mail address.
Screen Shot 2016-03-06 at 4.06.19 PM
Step three: Setup FormMule to send responses automatically
Once the form is created (including an e-mail field), you must setup the FormMule add-on so it e-mails students their answers immediately. I want to emphasize, FormMule is an add-on for Google Sheets, not Forms. Once you create a form, Drive creates a corresponding Sheet where the data is entered every time someone completes your form. The spreadsheet will be in the same place as your form, so just go back into Drive and open it up. Once you have opened your spread sheet and installed FormMule, this process is pretty simple and straight forward. Here are the steps to complete this process:
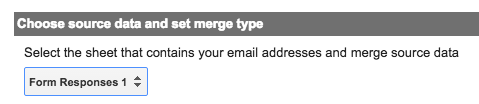
1. Choose your data source, which should be the worksheet labeled Form Responses 1.
Screen Shot 2016-03-06 at 4.12.43 PM
2. Setup the form trigger to send a message as soon as the form is submitted. You can also setup FormMule to send the responses at a later time, which is what they call a Time Trigger.

Screen Shot 2016-03-06 at 4.22.57 PM
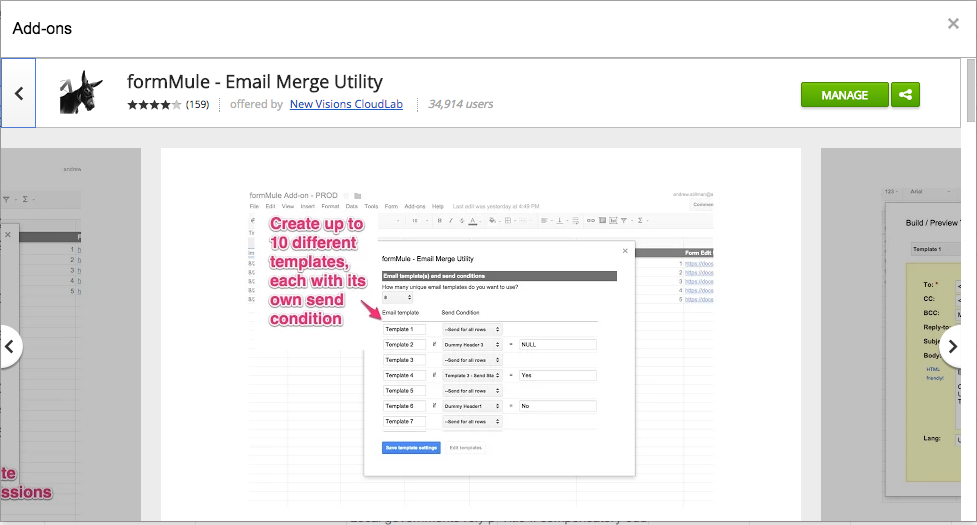
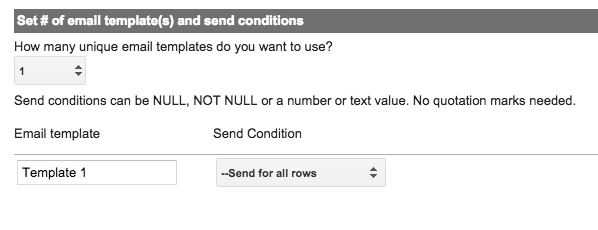
3. Decide how many different templates you want to send students, and the establish conditions for each template. For example, if you are giving a multiple choice quiz you can use formulas to automatically grade the responses and send students either a certificate of completion for passing or a notification that they will have to retake the quiz. My recommendation, especially if you are new to FormMule, is to start simple by sending students a copy of what they just submitted to you. Once you feel more comfortable with this process, you can branch out and try sending different messages based on specific criteria.
Screen Shot 2016-03-06 at 4.33.31 PM
4. Now you can create the message students will receive when they submit their responses. Because this is essentially a mail merge, you can integrate data from the spreadsheet into your customized response. To do this, you simply click on a merge tag and it will be added to your message. There is no text editor built into the template builder, so you will need to use good ole' HTML if you want to add any design features to your message. Below is an example of confirmation message I have created for my students.
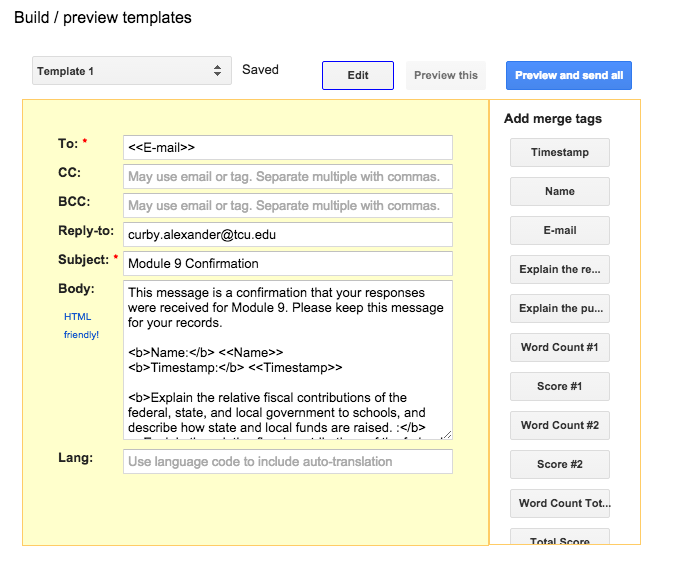
Screen Shot 2016-03-06 at 4.39.39 PM
Step four: Test your form
For me, this is the fun part. Once you have everything setup, you need to submit a couple of responses to make sure A) the confirmation message is actually sending, and B) the message looks like you want. I have to admit, I still get a little giddy when a message is automatically sent and it looks just right. Once everything looks just like you want, you are ready to go.
Feedback from my students has been they appreciate getting a confirmation message rather than feeling like their answers are being sent somewhere into the abyss. My next post will show you how to automatically score student multiple choice items, which is a pretty handy tool for giving immediate feedback.