Managing Learners: Tools for organizing your class

Of the many ways ITC has changed (and is changing) education, none seem more obvious than e-mail and learning management systems. It seems students these days expect ubiquitous, continuous access to course content and their teachers. How do I know this? Well, for one, I commonly get e-mails from students in the middle of the night. I am no longer surprised when I wake up in the morning to e-mails from students, most of them sent well past midnight. I do not think they expect an immediate response, but it reveals a student's mindset when you see he has sent a message in the middle of the night the instant he had a question about an assignment or grade. Second, my students are quick to let me know if they cannot access a course document or cannot see their grade. If the gradebook in my LMS were a section of the Oregon Trail, it would look like this.

The course syllabus? It probably looks more like this.

I am digressing. Anyway, teachers these days must anticipate the "right here, right now," mindset of many students and parents. Over time, report cards were augmented by weekly take-home folders, then daily homework planners, and now the LMS has crept into K-12 schools. Some schools have adopted an LMS that every teacher is expected to use. This was the case at the private school where I worked a few years back. Teachers at this school were expected to post grades, assignment details, worksheets, and other announcements each week. In other cases, a teacher may choose, independent of the rest of the school, to use an LMS in this way with students and parents.

This past week in my class, we explored various options available to teachers who want to use an LMS for managing learners and organizing content for their class. Before we looked at any platforms, we discussed the features one would expect to see in a LMS, and we listed them on a shared Google Doc, which the students filled out as they explored. Here are the results of our exploration.

Features Edmodo Chalkup Homeroom
Upload course materials
Upload materials in a variety of media (e.g., post a video for students to watch)
Discussion tool
Message tool
Announcement tool
Dashboard with upcoming assignments
Submit assignments
Submit using a variety of tools
Quiz tool It may be there, but we couldn't find it
Embed content from other sources Only from pre-selected sources
Features of this tool that may be particularly appealing. Links to Google Drive, Archives class data, calendar linked to assignments for multiple classes. Teacher can annotate papers, messaging feature, flashcards Interfaces with Apollo (the BYOD presentation tool). Quizzes can be tracked in realtime using a simple dashboard.

There are some obvious omissions on this list: Schoology and Google Classroom. This is mainly because we only had 2 hours and 40 minutes, so I had to make some choices about what to analyze. We already had someone demonstrating Edmodo, and I felt like Schoology was similar enough to skip past it. Some of the students actually mentioned it as we discussed Edmodo, and they were able to identify the similarities and differences themselves. I would have LOVED to show the class Google Classroom. I would love to see Classroom for myself, for crying out loud! Yes, most of their tools and features are available and free to everyone, but there are some that are not. This is especially true of GAFE, where if you are not in the club, you are WAY out of the club. So, this class exercise was not exhaustive, but I believe it gave the students an in-depth look at different ways to design an interface, features to include and leave out, and how easy different tools are to use.

What am I missing (and don't say Google Classroom!)? Are there features or whole platforms I didn't address?

Learning How to Learn: Growing a PLN

As a teacher, professor, or instructor at any level, one of the keys to survival is knowing how to continually learn and grow. Personal learning is one of the characteristics of teaching effectiveness. It is easy to get stuck in a rut in any profession, but teaching is especially vulnerable to this tendency because teachers are continually having to adapt to new students, new materials, new mandates, and new approaches to learning. It's surprisingly easy to just find a comfortable middle ground and float along, usually at the students' expense.

One of the most rewarding endeavors I have ever pursued as an instructor is connecting with other educators in my PLN (personal learning network). Learning from other instructors, most of whom I will never meet in person, has expanded my knowledge, skills, and understanding of the teaching and learning process in amazing ways.

What do you mean by "connect"?

Over the past several years, I have participated in communities of practice with other educators around the world. Some of them live in my city, others live on the other side of the planet. I have used a variety of digital tools to create my PLN, all of which have contributed to my professional growth in some way.

Blogs

Over time I have created a list of blogs by like-minded educators who have a similar goal: design and implement innovative teaching strategies to increase student learning, engagement, and motivation. I use tools such as Feedly and Flipboard to aggregate blogs so I only have to look in one place to see updates and new content. Most of these blogs are focused on educational technology and classroom teaching, but just because I use technology to stay up to date does not mean I am only learning about technology. I have learned strategies for facilitating discussion, embracing diversity, addressing cheating, and many other teaching topics.

Communities

In addition to following a collection of blogs, I also participate in different communities. These communities are hosted on social networking sites, and they are pretty easy to follow. For example, I am currently in about 15 Google+ communities, and I can get updates on new posts by scrolling through my news feed. I also follow about 30 different educators and innovators through Twitter, and it is pretty easy to scroll through updates to see their latest ideas and discoveries. Finally, I have joined a few different LinkedIn groups, and I get a weekly digest of anything that has been happening there. The point is, I do not have to spend a lot of effort staying updated on what is going on in these different communities, and when I do get updates I almost always learn something new.

Participation

The final way that I have gotten involved in my PLN is to actually participate and be a contributor. This blog has become my channel for processing, sharing, and reflecting on my own teaching ideas. Most of my posts would just sit isolated in cyberspace if I did not share them with my communities. By not only learning from others in my PLN, but also sharing my own experiences, I have become an active participant in this global experiment known as the World Wide Web. It's one thing to try other people's ideas, but it is downright exciting to find out other people are learning from me and trying MY ideas with their students.

Casting the Vision

This semester in my graduate-level technology class, I decided to do something new. I created a semester-long project where my students would build, engage, and participate in their own PLN. The first phase required them to join various communities of interest and follow different folks on blogs and Twitter. I gave them some suggestions, but I know some of the students have already branched off into their own interests. The second phase was for them to share what they were learning within a private Google+ community that we all joined. This way we could share what we were learning in a safe, secure place. The last phase, which is still underway, will be for the students to share what they are learning within the communities they have joined. This may mean sharing items they find, writing and sharing their own blog posts, or participating in discussions online. Since this project is currently underway, I can't really measure whether or not it is going well. It's going better than I anticipated, but I will not know the extent of everyone's participation until a few more weeks have passed. It took me a few years to become fully immersed in my PLN, so I can't expect a full conversion from my students before we've even reached midterm. But I'm committed to see this through. I cannot understate the value of my experience learning from and engaging with other innovative teachers. It has been transformative and deeply rewarding, even though some of those other educators have no idea I am learning from them. I would be remiss not to provide the same opportunity to my students.

So, what strategies or projects do you use to get teachers immersed in their own PLN?

Give students timely feedback with a leaderboard

Turning something into a game does not necessarily mean people will suddenly like it. Atari learned this the hard way with their E.T. video game. It turns out that betting the farm on a mediocre video game based on a blockbuster movie is bad business.

The same is true with gamification, a term being thrown around a lot these days in education circles. The general idea behind gamification is that game mechanics can be used in non-game environments in order to get some of the same outcomes typically associated with games, such as engagement, problem-solving, cooperation, and motivation. Many teachers are applying the principles of game mechanics to course design in order to motivate their students in ways traditional instruction does not.

If a teacher wants to be successful at implementing gamification mechanics in the classroom, there are a few principles that must be addressed. Foremost, the game must be well designed with clear goals, rules, and roles. Kind of like teaching. In my own experience, another aspect of a successful game (and teaching) is timely feedback. In order to make good decisions that help the player keep moving forward, they need to know where they stand. There are many popular activities that rely on the concept of leaderboards, which have the dual role of informing players where they stand and creating drama for both players and observers. Figure skating, gymnastics, X Games, freestyle skiing, golf, and diving are just a few of the sports that use leaderboards.

Leaderboards can be applied to educational settings as well, but there are very few tools available that teachers can use to create and use them efficiently. One such tool is Leaderboarded, but it is not free and seems be designed more for business than education. After looking around and not seeing many options for my own leaderboard, I decided to do what I do best: build one using Google tools. Below are the steps to help you get started on your own leaderboard. You can also view an example of my leaderboard spreadsheet, and feel free to copy it into your Google Drive if you want to see my formulas for each column and worksheet.

Step 1: Create your point structure

Before you can have a leaderboard, you have to decide where the points are going to come from. You have lots of options for students to earn experience points, quest points, or any other kind of value that can be added to the total. I kept it simple and based my point total on attendance and modules completed. Every time a student is on time to class, they get 100 points. They get 50 if they are late, and zero points for missing class. Even if the student is sick. I'm playing for keeps here, folks.

Step 2: Set up your spreadsheet

I have found that I am more likely to keep my leaderboard updated if I have very few values to keep up with. The more complicated the "game" becomes, the more there is to enter. Personally, once I start feeling overwhelmed I am likely to get behind on entering values. The more behind I get, the more irrelevant the leaderboard becomes. So, keep it simple.

As you can see from my example, I created a separate sheet for each set of points. One for attendance and one for modules. I used the SUM and COUNTIF functions to tally the values for each sheet. I chose to use the digit 1 instead of 100 or 50 because it is easier to enter. I can have the spreadsheet multiply by 100 on the Participation worksheet so I don't have to.

You will use the Participation sheet to add up all of your totals from attendance and modules. This worksheet is important to include because you will use a pivot table to create the actual leaderboard, and you must have all of your points on one sheet to do that.

Step 3: Create a pivot table

What is a pivot table, you might ask? Well, it is a data analysis tool built into most spreadsheets that lets you sort, add, average, or do other functions with the data in your spreadsheet. For this example, we are going to use the pivot table to display each student's total points and rank them from highest to lowest. Here is a screenshot of what this pivot table will look like when it is all set up.

Screen Shot 2014-06-20 at 10.05.54 PM

Leaderboard_Example_-_Google_Sheets_and_Pictures

Make sure every student in your leaderboard has a unique name, otherwise the pivot table will combine the totals for both students with the same name. I used numbers to keep the first initial separate. You will notice I have a battery icon for each student. I did this by creating a Rank worksheet and using the VLOOKUP function to apply the correct icon based on the student's total points. I did this more as an experiment. If you embed this spreadsheet using HTML, the images will not show up, so don't get your hopes up.

Step 4: Share the sheet with students

At this point, you have several options for how to share your leaderboard.

Option 1: The Whole Spreadsheet

The simplest option is to share the link with the class or embed using the iFrame code Google gives you. If you share the entire sheet with the class, which I DO NOT recommend, you will want to protect your functions and make sure it is only viewable to those with the URL. If you choose to embed the entire spreadsheet, go to File --> Publish to Web. This will share your entire spreadsheet, so you need to make sure there isn't any sensitive information that you don't want the whole class to see. If you use icons for levels like I have done, they will not show up when you embed.

Option 2: One Worksheet from the Spreadsheet

If you only want to embed the leaderboard, you can use a special URL to show only the page you want. It looks like this, and I will show you how to plug in the appropriate values.

<iframe src="https://docs.google.com/spreadsheets/d/[Spreadsheet ID]/htmlembed?gid=[worksheet ID]&amp;single=true" height="1000" width="100%"></iframe>

Here is where you find those values in RED:

Google_Drive_--_Page_Not_Found


This will embed only the sheet you want to share, but it will not show any images you have in the cells.

Option 3: Interactive graph from Spreadsheet

A final option for sharing the leaderboard is to create an interactive chart from the leaderboard and embed that wherever students will be looking for updated results. Here is how you do this:

Leaderboard_Example_-_Google_Sheets 2


Leaderboard_Example_-_Google_Sheets 3


Leaderboard_Example_-_Google_Sheets 4


Screen_Shot_2014-06-22_at_11_07_11_PM


Leaderboard_Example_-_Google_Sheets 5


And that is how you do it. This will take some tinkering, especially if you are not familiar with spreadsheet functions or pivot tables. I spent quite a bit of time messing around with this until I got it to work just how I wanted. I need to give credit where it's due for giving me this idea. I got the original idea from the EIPS Technology Blog, and I modified my leaderboard based on this design.


Ripple Effect

Screen Shot 2014-05-08 at 9.00.09 AM Last fall I taught a class on Digital Communication and Collaboration. We talked about, among other things, the power of creating a PLN (personal learning network). We read a book on this topic, shared a few articles, and had some interesting discussions. What we never really did was create or participate in a PLN in a meaningful or transformative way. This included me, who had always been a solitary and introspective kind of guy. I followed a few blogs and tweets, but I was not an active participant in any kind of PLN. This makes teaching the benefits of a PLN a really hard sell, to say the least. At the end of the semester, I was determined to change that.

I started this blog in 2009, and until this January had never had more than 20 views in one day. I would post sporadically and rarely shared anything I wrote. The blog, for all intents and purposes, was a sandbox for me to kick around ideas and journal some of my experiences as an instructor, faculty member, and techie. My total number of views (if those analytic statistics can be trusted) from 2009 to 2013 was roughly 1,800. My point is, I was not breaking any kind of internet records with my blogging skills. On a side note, let me just tell you that keeping a blog going is hard work. This is due to the fact that:

  • I'm one guy
  • It's not my job
  • TCU and my family keep me quite busy
  • I am not a fount of awesome ideas

Having shared this, you can see that the baseline was quite low and any movement of the needle would be easy to detect.

Coincidentally, around the beginning of the spring semester I shared some tech ideas with my college in a faculty meeting and decided to write them up in a series of blog posts. Based on my experience the previous semester in my class, I was already connected to several communities and groups on Google+ and Twitter. So, I thought why not share my posts in those communities and with a few folks via strategically placed tweets. What happened next really opened my eyes to the potential of connected learners and social media.

On the image above, you can see in green where I wrote something new on my blog. I blurred out the dates and stats because I guess I'm kind of self-conscious and it kind of feels like taking a screenshot of my bank account. Anyway, as soon as I was done with my blog post, I would send it out to a few different Google+ communities and on Twitter. The orange arrows represent the activity around that post from those communities. This consisted of sharing, retweeting, scooping, e-mailing, Facebooking, etc. my  content with others. Since I use Wordpress, I was able to see the source of my web traffic. The buzz would wane over a few days, then sure enough someone else would pick it up and share it again, causing my stats to spike again (though never as much as the first time).

An interesting observation from this is the 3rd green arrow. I posted this but decided not to share it with my usual peeps. It was more introspective and not really that interesting to most people. Someone who follows my blog, however, shared it on Google+ and Twitter a few days later, causing quite the spike in traffic for a couple of days.

This has been an interesting and serendipitous experience, to say the least. I am a self-described technology ninja, an emerging technology samurai, and not really a technology shogun (leader) at all. Jumping into the world of sharing, re-sharing, and joining the larger ed. tech. conversation has definitely let me see firsthand how powerful this can be in a person's personal and professional life.

And yes, I plan on sending this out for the masses to read, share, and re-share. If you want. No pressure.

Are You a Technology Ninja or Samurai?


ninja-samurai

I will start by stating the obvious: There is a HUGE difference between learning to use technology for yourself and using it effectively in the student learning process. Both applications of technology have specific skill sets, they inform each other, and they are both important. In the educational technology world, you might see this dichotomy through various lenses: digital media literacy, TPACK, SAMR, or some other framework you're fond of presenting at conferences.

My awareness of the massive difference between these technology applications came when I began encouraging the students in my large, 100-person education course to bring their laptops, tablets, and phones. OK, I don't have to actually encourage college students to bring their phones to class. Pry them out of their hands? That's more like it. Anyway, once I began infusing my class with activities that require technology, I realized I am not as good as teaching with it as I thought I was. Yes, I knew how to do some cool things to present information to my class, but when it came to using technology in real time with 100 students in a way that kept them active and engaged, I had a lot to learn. This is when I decided I was a pretty good Technology Ninja, but I had a long way to go until I was a Technology Samurai.

What do these two terms mean? Let me explain.

Technology Ninja

Ninja were covert agents who specialized in espionage, assassination, sabotage, and infiltration. They were skilled at disguising themselves as servants, camouflaging themselves with trees and other objects, and scaling the walls of buildings like Spider-Man. Their objective was to infiltrate enemy dwellings without being seen. In fact, there is probably a ninja in your pantry right now, scooping out your peanut butter with a Chinese Throwing Star.

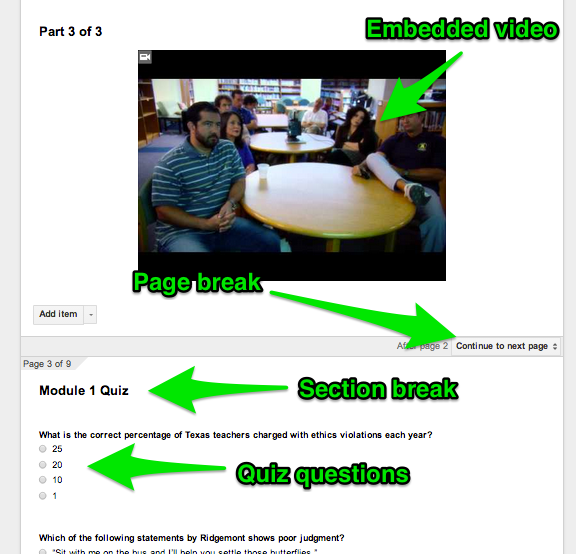
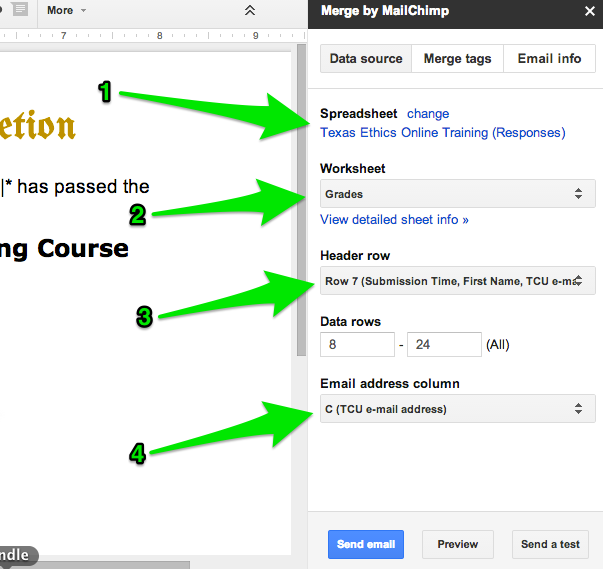
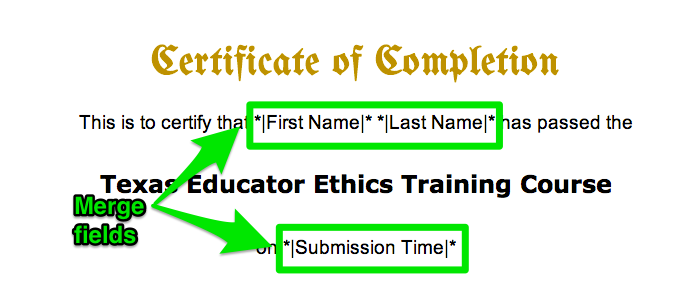
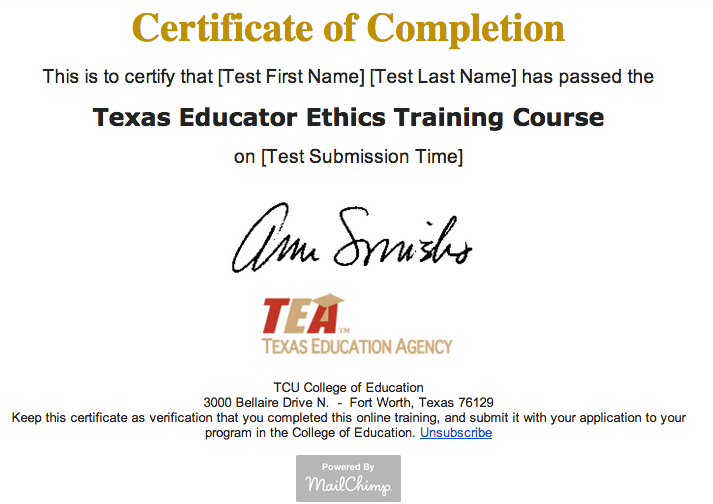
As a Technology Ninja, I have gotten really good at using technology in ways that my students hardly know it's there. My most recent set of posts about Outsmarting the LMS is a good illustration of ways to be a Technology Ninja. You can embed documents and web pages, install scripts, and set up forms to make your job easier, and the people actually using these tools have no idea about the magic you have worked on the back end. They just know it works.

While these ninjutsu techniques save me a lot of time and energy in the long run, they do very little to influence the lived experience of my class meetings. Most of the work is done in the background, usually in the form of tinkering, testing, and modifying. It wasn't until I told my entire class of 100+ students that I wanted them to bring their devices to class that I realized these skills were not sufficient for me to reach the level of technology greatness I have always aspired to achieve.

Technology Samurai

When I first began thinking through these ideas, I wrote this out as SAMRi. Get it? SAMR with a lower-case i, like Apple does, only at the end of the word instead of the beginning. Because I am aiming for the R (redefinition) in SAMRand after I achieve the R in my technology integration skills/knowledge, then I will be a technology SAMRi! Uh ... yeah. Anything that needs that much explanation is not as clever as I initially thought it was. Also, SAMRi would direct a lot of traffic to my blog by people looking for Saudi Arabian folk music.

So, what is a Technology Samurai? The traditional samurai were an elite class of noble Japanese warriors, dedicated to protecting their culture, leaders, and territory. Unlike those stealth and sneaky ninjas, they were skilled at hand-to-hand combat and infantry tactics. Their weapons of choice were swords, kama, longbows, daggers, and armor. They were skilled horsemen, and they were also known to use rifles and cannons in the latter years of their existence. Samurai were also governed by a strict honor code, characterized by discipline and loyalty. In a word, they were fearless.

You know what else is fearless? Telling your class to BYOD. Unless you have thought through the details of your activity, you will have students knee deep in Pinterest or Facebook before you can say, "OK, let me just try one more thing to get this to work." Students love technology, but not in the way nerds like me think they love it. They love that technology connects them to the things they love.

So, after having done this for a semester, I have started coming up with a few essential skills that every Technology Samurai must master. These skills/tools are focused primarily on teaching in a BYOD or 1:1 environment. I will address being a Technology Samurai in the areas of digital media projects, collaboration, research, etc. in the coming weeks.

Sync your class

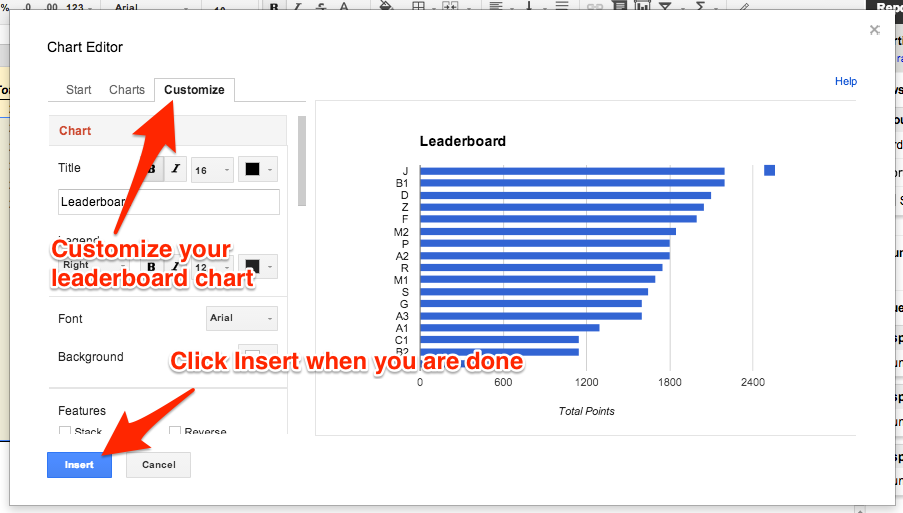
You must have a way to get every student in the same place and keep them there. Your class LMS page won't work. Neither will a Facebook group or Schoology or Edmodo. Why? There are too many other features to look at. Grades, assignments, forums, friends. Too many distractors. You need to keep them all in the same place at once. I recommend a tool like Apollo or Top Hat. If all of your students are on iPads, you may consider NearPod. Each of these tools has something in common: they put your content on every screen in the room at the same time. Yes, students can stray away, but not as much as you might think.

Reduce Friction

This is something that took me awhile to figure out. Personally, I do not like logging in to things. I would much rather log in once and then have the tool remember me. Google, Facebook, Pinterest, Twitter .... they are great at this. My school's LMS? It's like Guy Pearce in Memento every time I close the browser window. Whenever possible, I try to minimize the number of times students have to log in to do class activities. Once is ideal, twice is acceptable, three times is just getting to be plain annoying.

Collect student responses

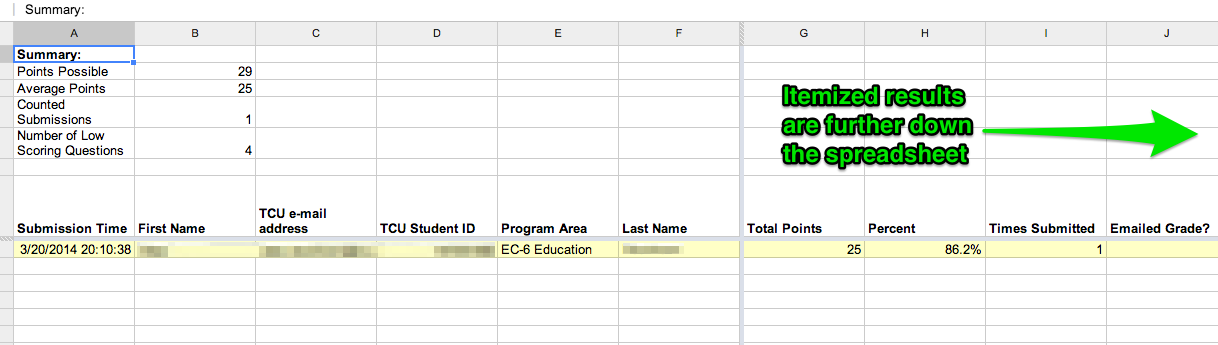
In addition to getting all of the students in one place, virtually speaking, you want to keep them engaged. A good way to do this is to involve them in activities that make them think then require a response. There are several tools that will let you do this. Apollo and Top Hat have built-in student response features. Socrative and Infuselearning provide another way for students to respond, and they do not have to set up an account to do it. They just enter the class code, and they automatically receive a prompt every time the teacher posts a question.
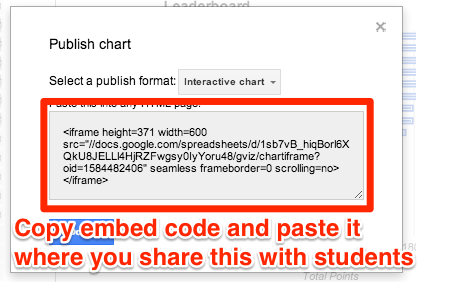
Deploy links

Another important tool to have in your arsenal if you are going to teach like a samurai is to be able to deploy links to the class. By deploy links, I mean send the student out from your synced content to other content (videos, web pages, forms, etc.). Apps like Apollo and Infuselearning have a built-in link tool that will send a URL to every student logged into your class page or presentation. This is really handy if you want students to spend a few minutes reading and discussing an article, blog post, video, or image. You can also send the students to an editable Google Doc, Sheet, or Presentation if you want to give them a place to discuss or share ideas.

An acceptable alternative to sending links to students is using a URL shortening tool, like bit.ly or goo.gl. Just remember to use a serif font so the students can tell the different between capital I and lower-case L. You may also want to consider if this is appropriate based on the size of the room and projection system, the age of the students, and number of times you are having them key in shortened URLs. If you have a bunch of these on the board, it may get confusing to the students.

Facilitate group work

Another skill to master as a Technology Samurai is to keep students engaged in group activities with their computers. I mean, the students have lugged their computers to class and followed along up to this point, so why not do some things with computers that computers are uniquely good at doing. Maybe that involves editing the same document at the same time, or adding slides to a common presentation. You can have them pin and explain places on a map.  Annotate or draw images using the drawing quiz tool in Apollo or Infuselearning. Create a 5-picture story, or capture a 30-second explanation on Educreations. I'm not trying to exhaust the possibilities here. If you went to the trouble to have the students bring their computers to class (or went to the extreme trouble of providing a device for every student in the school), then leverage the capabilities of a computer. Don't use it like a pencil then complain that students just want to look at Pinterest.

Showcase the students

Now that you have had the students doing some activities on the computer during class, showcase their work. Display their annotations and diagrams. Flip through the presentation and let each group present their page. Show the 5-pic stories and see if the students can guess the topic. Watch the 30-second explanations. This part of the BYOD learning environment is more than the payoff. It's the point in the lesson in which you communicate to your students whether you, as the chief learner in the room, value this activity as a real learning endeavor or just a hi-tech time filler. If you truly value the work they are doing, then devote time to acknowledging, praising, critiquing, and sharing the fruits of their labor. If you blow past the showcase, don't be surprised if the students show less enthusiasm and engagement the next time around.

You should strive to be both a ninja and a samurai. A samja. A ninjurai. A SAMuRinja. Both skill sets are important for teachers these days, for different reasons. One will keep you learning, the other will help you focus on student learning. The way of the ninja and samurai is not easy. They involve risk, uncertainty, failures, faith, persistence, patience, creativity, and problem solving. There is great cost in becoming a lifelong learner, but it's not nearly as costly as settling in and ceasing to grow and develop as a teacher.

So, what are your examples of being a Technology Ninja or Samurai? I will follow up on this, and I would love to hear your ideas.

Some Bullet Points and a Picture

As a teacher, I am always making instructional decisions. More often than not, these decision manifest themselves as questions. What do I want the students to know, understand, or be able to do at the end of my lesson? Who will do most of the talking, me or the students? Where does this lesson fit in the big picture of the class? Will I use technology? Will the students use technology? In addition to asking myself these questions, I am also continually looking for ways to teach better. That includes instructional strategies and technology. In some cases, the stars align and I discover strategies in which technology allows me to teach a lesson in a completely new way. For those SAMR enthusiasts out there, this would be R, or redefinition.

One such idea I recently came up with is an activity I call Some Bullet Points and a Picture (SBPAP). Yes, I have a dry sense of humor. This activity builds on the time-tested teaching strategy of having students work in groups and put their ideas down on chart paper. I love this activity, especially for class reading activities. I will assign an article, divide the class into groups, have them read a specific section of the article, then summarize and share their section with the rest of the class. This is a great way for the students to take ownership of the article and teach it to each other. It also gives them an advance organizer for when they go back and read it again for the exam.

SBPAP is the same idea as using chart paper, but the students summarize their group discussions on separate slides in a Google Presentation. I did some minimal setting up before class by creating the presentation, making it editable for anyone with the link, and creating a separate slide for each section of the article. The students then went to the Google Presentation, found their slide, and began summarizing their section of the article. The only two rules were 1) they had to paraphrase every main point in their own words, and 2) they had to find a picture that characterized their main points. The students used the research tool to find their images so they did not have to leave Google Presentation. Overall, the students loved the activity and we had a lot of fun seeing everyone's slides get edited at once.

There are some obvious advantages to doing this activity with a Google Presentation instead of chart paper:

  • The summaries are all in one place, so I can see which groups are making progress and who is not
  • Since the students are all working on the same presentation, I can project it and have each group present their ideas
  • The research tool allows the students to search for images, videos, quotes, charts, facts without leaving the presentation
  • After the activity is over, I can export the presentation as a PDF and post it to my LMS
  • The slides give me a record of what we covered in class, especially for students who missed and want to know if we "talked about anything important"
  • I don't have to figure out what to do with the chart paper after the activity is over

SBPAP was a great way to engage the students and have them actively learn the content. I will definitely do this again, and I may even think of some other ways to modify this activity and leverage more features of Google Presentation.

What are some innovative ways you have used Google Presentation in your classes to facilitate group work or engage the students?

Outsmarting the LMS: Creating a DIY Learning Module

Everyone is talking about the "flipped classroom." I just attended a conference where this term was used approximately 57 times every hour for 4 days. My first response to this term was positive when I heard it a few years ago.  The flipped classroom is a teaching approach where teachers provide resources for students to build their background knowledge outside of class and use class time on activities that leverage face-to-face interaction, such as discussion, group problem-solving, and collaboration. This contrasts with the "traditional" model, where instructors spend class time transmitting information, and then require students to engage in the aforementioned higher-level learning tasks on their own outside of class. This concept has so much curb appeal because students, generally speaking, don't like lectures, and instructors don't really like the behaviors associated with lecturing (e.g., falling asleep, playing on phones, doing homework for other classes). Once you strip away the buzz words, the descriptions of "kids these days and their mobile computer thingies," and a mish-mash of learning theories, you realize the basic premise is the same model teachers have used for years. My teachers assigned reading outside of class, my coaches required me to lift weights and do endurance runs (yes, I'm a runner) on my own, and my music teachers expected me to practice my part so that group rehearsals were about dynamics, tempo, and other music terms I can't seem to recall. The difference, of course, is that technological innovations have changed the variety and delivery method of learning materials being pushed to students before they come to class. Teachers can compile videos, readings, simulations, quizzes, games, and other media to communicate the same concepts that were traditionally transmitted in class via lecture.

There are many tools on the web that help an instructor facilitate a flipped lesson. EdPuzzle, eduCanon, and Ted-Ed come to mind. Each of these tools has its unique affordances, but they require students to have an account and to sign in. What if you want to avoid that part and skip straight to the learning module? This is where Google Drive comes in. I will briefly demonstrate how to build a DIY learning module with Google tools and add-ons.

Step 1: Create a Google Form

Google Forms is an excellent tool for creating web-based surveys. Users can add a variety of questions, from simple text to a grid. There are also some simple media and layout tools, such as adding images and video, page breaks and section headers. These are all great tools if you want to manage the flow of the survey. Google has created some excellent tutorials on how to create and use their forms. Below is an example of one of my forms I created a for a learning module in my college. The videos were created by a state agency for the purposes of a required training that is no longer supported by said agency. In other words, they gave us the videos and want us to handle the training in-house.

Texas_Ethics_Online_Training_-_Google_Drive

Step 2: Set up the spreadsheet

The results from this form will automatically feed into a Google Spreadsheet. This is a great way to keep track of who has completed the training, but by itself a spreadsheet is not very useful for grading the quiz. Using a simple script for Google Sheets called Flubaroo, you can create a key and automatically grade the results. The scored quizzes are put in a new sheet within the spreadsheet, and it will also e-mail the results to each student, if you choose that option. I have the spreadsheet set up so I am notified every time there is a change. Here is a example of a graded quiz.

Texas_Ethics_Online_Training__Responses_

Step 3: Create a certificate of completion

In my case, the students and faculty who complete this training need a certificate. The state agency used to do this automatically through their training module, but now we have to do it. Since there are so many people completing this training, I needed a tool to automate most of the process. My tool of choice is the Google Docs add-on Merge by MailChimp. To do this, you first add the add-on to your Drive account. You then create a merge template, like the one below:

Copy_of_Ethics_Texas_Certificate_template_-_Google_Drive

Next, you open the Merge by MailChimp panel.

Screen Shot 2014-03-25 at 9.36.06 AM

You will need to do some clicking to merge your two documents by:

  1. Choosing the spreadsheet you will use as your data source
  2. Choosing the sheet from within your spreadsheet
  3. Identifying the header row (which will determine the names of the merge tags)
  4. Identifying the column with e-mail addresses, where the merged documents will be sent

Copy_of_Ethics_Texas_Certificate_template_-_Google_Drive 2

You will also need to add merge fields to the document, which will pull data from the spreadsheet and input it into the template. You do this from the Merge Tags section in the MailChimp panel by simply placing the cursor in the document where you want the merge tag and clicking  the merge tag in the panel.

Copy_of_Ethics_Texas_Certificate_template_-_Google_Drive 3

The form that is mailed to each person in your spread sheet will look something like the screenshot below. Notice, the person's e-mail client may strip out some of the formatting, such as fonts or colors. The details at the bottom of the merged document were added from the Email Info tab in the MailChimp panel. Also, the merge fields in the actual e-mail will not have brackets.

_Test__Texas_Educator_Ethics_Training_Course_certificate_-_curbyalexander_gmail_com_-_Gmail

And there you have it. Yes, it is pretty involved, but not much more than doing the same thing through SoftChalk or iSpring or any other eLearning tool, and it is totally FREE! This method could be used to give students survey or test results with feedback, digital badges, or progress reports. I should add one final word, which is that there will be some tinkering along the way. Each tool I presented here has a learning curve, and unless you have used mail merge in MS Word before, this will take some patience and repetition. Coming from someone who has done this using just about every possible method and tool, this process is pretty slick once you get used to it.

So, what tools do you use for this type of learning object? Is there a step I am missing or an easier way to do this? Let me hear from you.

All In: The New LMS

Today I attended a presentation sponsored by Apple about the changing role of mobile technologies in higher education, particularly colleges of education. This is of particular importance to my college right now because we are beginning to talk a lot about how and why to use different types of technology in our courses. Many faculty have been using technology for many years in their courses, but we are starting to see a shift in the role of technology in terms of how students access and use information. The presentation today, given by John Landis, Ph.D., was very much in line with the conversations I have been having with some of my colleagues over the past few months.

I will be honest, Dr. Landis' presentation was impressive. He is a great storyteller and is current on the trends and predictions sweeping through both K-12 and higher education. He understands that technology has traditionally been used to help teachers do what they've always done more efficiently or faster. He knows that students these days can get the same content traditionally transmitted from the instructor on any device, anywhere, at any time. And it's usually a lot more interesting. None of this was new to me, but it was still delivered in a fresh and relevant way. Landis presented a blend of theories, examples, and demos, primarily from his MacBook and iPad Mini, and the technology worked like a champ. He mirrored his iPad display using an Apple TV, and could switch pretty quickly to his MacBook Air to demo other programs. As a pretty heavy tech user, I was impressed that he was able to change speeds in so many different ways without so much as a hiccup.

What this presentation made very clear to me, however, was something I have been mulling over for quite some time. It is this idea that in order to fully leverage the benefits of one device, you must fully employ all of the devices in that particular ecosystem. In this way, Apple is actually becoming a device-based LMS. Just like Blackboard or Moodle have a suite of tools under the hood, Apple has an array of powerful tools that can really change the way teachers and students approach learning. The catch, however, is that one must buy in to the whole ecosystem in order to really see these benefits. For example:

  • I can create a customized, multimedia iBook on my MacBook for free, but it only really handles Mac-based media (.mov, Keynote, Pages, etc.).
  • Only my students with an iPad can download the multimedia version of the book and get the full benefit. Students running Mavericks can also read the book on their Mac, but students with Android or Windows devices are left behind.
  • I can mirror my iPad to my MacBook using AirServer, but it's not stable and does not work over my schools WiFi. If I want to really mirror my iPad, I need an Apple TV.
  • I can sync content across devices with a variety of tools, but the only way to sync ALL of my content is with iCloud, which is only for Mac.

The point is, each tool Dr. Landis showed us does amazing things. I want to try everything he showed us (except for the stuff I am already doing ... I want to keep doing it). But the only way to leverage the capabilities of each tool is to use it as part of the Apple Ecosystem (a term he used repeatedly). Apples are meant to work with other Apples, and there is really no motivation to make them work with Android (Google) or Windows. My workarounds, as I have found, are much more complex than the typical tech-using teacher is willing to mess with. I have found a way to teach from my iPad without using AirServer, which is a pretty awful replacement for an Apple TV. I use Google Docs to host and share course files, which works pretty well most of the time, but it's not as slick as content aggregated in an iBook. I have founds ways to do the things I want to do, but it's always a little more work when I am doing this across devices and outside "the ecosystem."

My take-away message is that Apple, Google, and Windows really are trying to create a system, and already have, where users must be "all in" in order to reap the benefits of their technology. More than ever, their tools only really play well with their own family members, and it is becoming increasingly difficult to lead a balanced digital life across platforms. With the exception of a few apps like Evernote or Google Drive, content on your device stays on your device.

I have no idea which ecosystem TCU will join, but I think they will eventually need to decide. These companies, which control the market, are leaving us very little choice otherwise.

One to Many: Using Ustream for an online study session

I try to be responsive to my students each semester and make adjustments to my courses that let them know I value their opinion. There are some things I don't change, such as assignments or due dates, but there are other areas in which I can be responsive. One such area is providing the students with resources that will help them be successful on the exams. After the first exam, some students were freaking out about the sheer amount of information I was expecting them to remember. In order to focus their efforts, I began sending out learning objectives after class. I think this helped, but some of them still felt overwhelmed.

This is when I decided to hold an online study session. I had been playing around with Google Hangouts, and I thought this would be a great tool to facilitate a study session. However, after some testing and investigating I realized this was not the best tool for what I was trying to do. Google Hangouts only allows 10 people to join, and I have over 100 students. There is also a 2-minute lag in the Live Broadcast between what I am saying in real-time and when the audience actually hears it. This may work well for some types of broadcasts, such as a live event or a performance, but this does not work very well for a question and answer session.

After some exploring, I found out about Ustream. This tool is very much like Google Live Hangouts, in that someone can set up a broadcast and allow viewers to watch through a Web browser. I set up a channel for my class, which I sent out to the students the day of the study session. Presenters can either broadcast from the browser, using the iOS app, or download Ustream Producer and broadcast from their desktop. The browser and mobile app use the camera on your device, and you can only show your face. The Producer program lets you also share your desktop, which is what I used to share documents and slides from the class.

Once I had everything set up, I started broadcasting and recording the review session. The hardest part of this session was speaking to an empty room. Ustream is different than Google Hangouts or Skype in that only allows one-way communication. This caused some awkwardness because I did not get any feedback from the audience. I kept checking to see if the presentation was still recording, which made it even more awkward. The students sent me their questions using TodaysMeet, which is a simple, impromptu chat room. There is no sign-in required, and the room can be saved indefinitely. The recorded presentation is embedded below:

Video streaming by Ustream

The feedback from the students was quite positive about this review session, and the whole process was quite easy. This took about an hour of my time in the evening, and this is something I an easily incorporate into my class each semester. I hope to find more creative ways to host study sessions, but this was a good place to start.

Teaching Naked: The workshop, not the dream

Last week, I attended a workshop hosted by our teaching excellence center called Teaching Naked. This is a catchy title for both Jose Antonio Bowen's book and workshops, but I find it a little ironic considering the content from his presentation. When I think of "teaching naked," I think of eliminating all adornments and superfluous elements from the class. I had a professor at UVa, Dr. John Sanderson, who taught this way. For an entire semester, he taught our Tests and Measures class without the use of PowerPoint, a LMS, or any other instructional tools. He showed a couple of short video clips on the VHS player, and he would occasionally bring some handouts. Most of his diagrams were written on the board when we arrived, and the majority of the class was discussion and lecture. It was an engaging class and quite helpful in my development as a researcher. I had already taken Stats I when I took Dr. Sanderson's class, and he did a nice job of filling in the gaps of what I had missed the first time. He truly taught naked. On the other hand, Dr. Bowen's workshop centered on using A LOT of technology. His approach to teaching could best be described as the "flipped classroom." He presents students with a variety of media to watch, think about, and learn outside of class, then uses class time to engage students in activities that require face-to-face human interaction. I like this approach to teaching and hope to emulate it with the same skill as Dr. Bowen, but I do not consider it "naked." In fact, it is quite heavily adorned with a host of social media tools, to the extent that I wondered how a students, or the professor, would keep up with it all. He talked about e-mail, Twitter, Socrative, Facebook groups, Google Hangouts, Skype, YouTube, Merlot, and several other tools. What he did not talk about at any point in the talk was PowerPoint. In fact, the take-away message from the workshop was, "Stop delivering boring lectures using PowerPoint and start engaging your class more ... during class time."

Some of Dr. Bowen's ideas were not new to me. Socrative, Twitter, YouTube videos, Google Docs. I use each of these tools in different ways to support my teaching and keep students connected to the class. Other ideas where, quite honestly, not ever going to be part of my workflow: Facebook groups, Skype, or MOOC's. But I did take away some ideas I would like to implement either this semester or in the spring. I have already taken one suggestion, which is to send student materials related to class electronically after class is over. This way, they are not reading the paper instead of listening. I also would like to try broadcasting a Google Hangout session live sometime before the next paper is due. I have responded to nearly 30 e-mails in the last two days, each of which ask essentially the same 3-4 questions. I will give the Hangout a try and see if anyone joins in to ask questions that everyone can hear the answer to. This also lets me record the session, so students who miss can watch it later. I have never been that open to devoting time in the evenings in this way, but after spending at least two hours in the last couple of days responding to e-mails, I like the idea of reducing this down to an hour. Show up, let the students ask their questions, and get them to work.

In addition to some new ideas to apply to my teaching, the hour and a half spent listening to Dr. Bowen speak was quite enjoyable. He's funny, intelligent, and has some very keen insight into the way students think and approach school. I haven't decided yet if I will read his book, but I will definitely look through his website for some new ideas. In no time, I will be teaching naked too!