Outsmarting the LMS: Creating a DIY Learning Module

Everyone is talking about the "flipped classroom." I just attended a conference where this term was used approximately 57 times every hour for 4 days. My first response to this term was positive when I heard it a few years ago.  The flipped classroom is a teaching approach where teachers provide resources for students to build their background knowledge outside of class and use class time on activities that leverage face-to-face interaction, such as discussion, group problem-solving, and collaboration. This contrasts with the "traditional" model, where instructors spend class time transmitting information, and then require students to engage in the aforementioned higher-level learning tasks on their own outside of class. This concept has so much curb appeal because students, generally speaking, don't like lectures, and instructors don't really like the behaviors associated with lecturing (e.g., falling asleep, playing on phones, doing homework for other classes). Once you strip away the buzz words, the descriptions of "kids these days and their mobile computer thingies," and a mish-mash of learning theories, you realize the basic premise is the same model teachers have used for years. My teachers assigned reading outside of class, my coaches required me to lift weights and do endurance runs (yes, I'm a runner) on my own, and my music teachers expected me to practice my part so that group rehearsals were about dynamics, tempo, and other music terms I can't seem to recall. The difference, of course, is that technological innovations have changed the variety and delivery method of learning materials being pushed to students before they come to class. Teachers can compile videos, readings, simulations, quizzes, games, and other media to communicate the same concepts that were traditionally transmitted in class via lecture.

There are many tools on the web that help an instructor facilitate a flipped lesson. EdPuzzle, eduCanon, and Ted-Ed come to mind. Each of these tools has its unique affordances, but they require students to have an account and to sign in. What if you want to avoid that part and skip straight to the learning module? This is where Google Drive comes in. I will briefly demonstrate how to build a DIY learning module with Google tools and add-ons.

Step 1: Create a Google Form

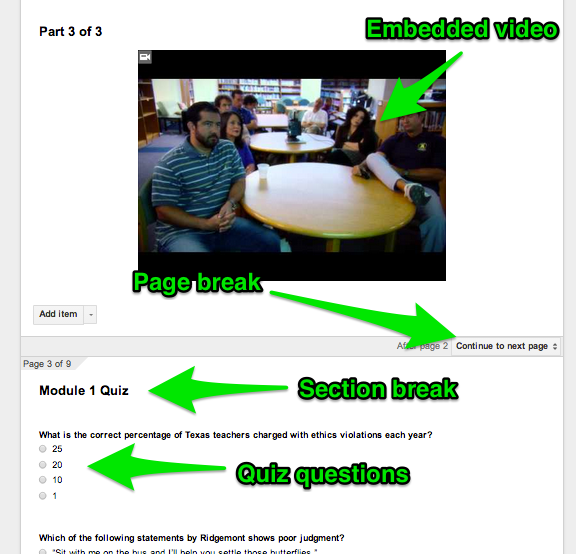
Google Forms is an excellent tool for creating web-based surveys. Users can add a variety of questions, from simple text to a grid. There are also some simple media and layout tools, such as adding images and video, page breaks and section headers. These are all great tools if you want to manage the flow of the survey. Google has created some excellent tutorials on how to create and use their forms. Below is an example of one of my forms I created a for a learning module in my college. The videos were created by a state agency for the purposes of a required training that is no longer supported by said agency. In other words, they gave us the videos and want us to handle the training in-house.

Texas_Ethics_Online_Training_-_Google_Drive

Step 2: Set up the spreadsheet

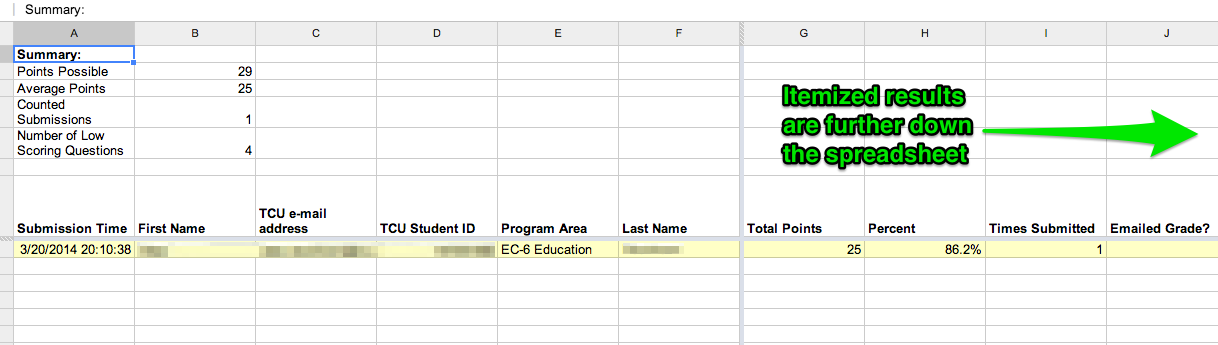
The results from this form will automatically feed into a Google Spreadsheet. This is a great way to keep track of who has completed the training, but by itself a spreadsheet is not very useful for grading the quiz. Using a simple script for Google Sheets called Flubaroo, you can create a key and automatically grade the results. The scored quizzes are put in a new sheet within the spreadsheet, and it will also e-mail the results to each student, if you choose that option. I have the spreadsheet set up so I am notified every time there is a change. Here is a example of a graded quiz.

Texas_Ethics_Online_Training__Responses_

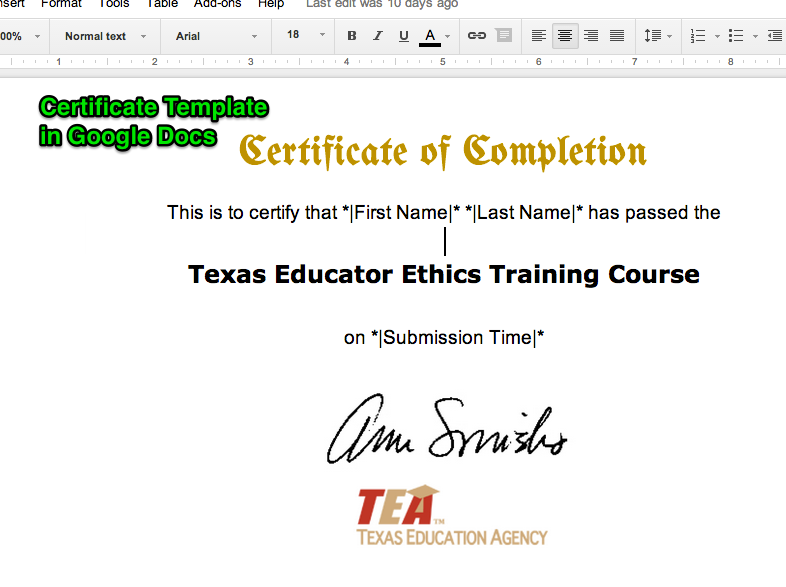
Step 3: Create a certificate of completion

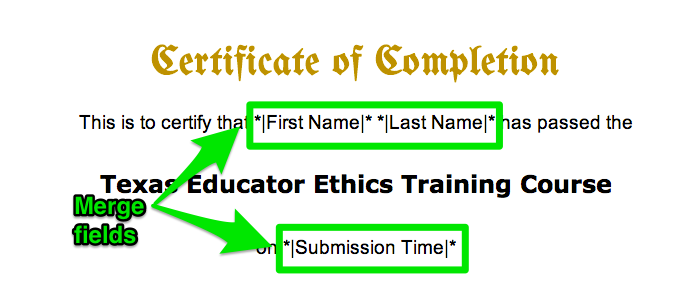
In my case, the students and faculty who complete this training need a certificate. The state agency used to do this automatically through their training module, but now we have to do it. Since there are so many people completing this training, I needed a tool to automate most of the process. My tool of choice is the Google Docs add-on Merge by MailChimp. To do this, you first add the add-on to your Drive account. You then create a merge template, like the one below:

Copy_of_Ethics_Texas_Certificate_template_-_Google_Drive

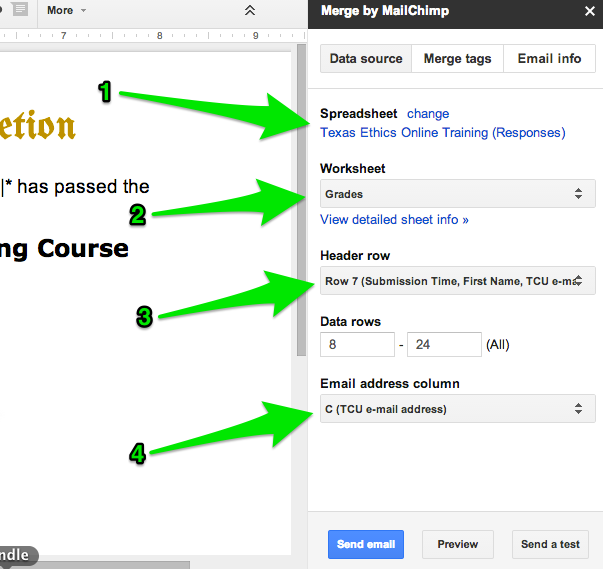
Next, you open the Merge by MailChimp panel.

Screen Shot 2014-03-25 at 9.36.06 AM

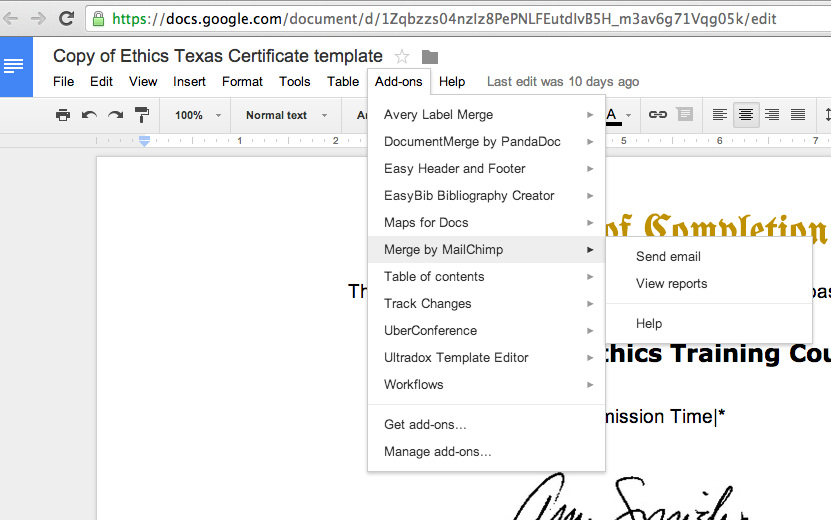
You will need to do some clicking to merge your two documents by:

  1. Choosing the spreadsheet you will use as your data source
  2. Choosing the sheet from within your spreadsheet
  3. Identifying the header row (which will determine the names of the merge tags)
  4. Identifying the column with e-mail addresses, where the merged documents will be sent

Copy_of_Ethics_Texas_Certificate_template_-_Google_Drive 2

You will also need to add merge fields to the document, which will pull data from the spreadsheet and input it into the template. You do this from the Merge Tags section in the MailChimp panel by simply placing the cursor in the document where you want the merge tag and clicking  the merge tag in the panel.

Copy_of_Ethics_Texas_Certificate_template_-_Google_Drive 3

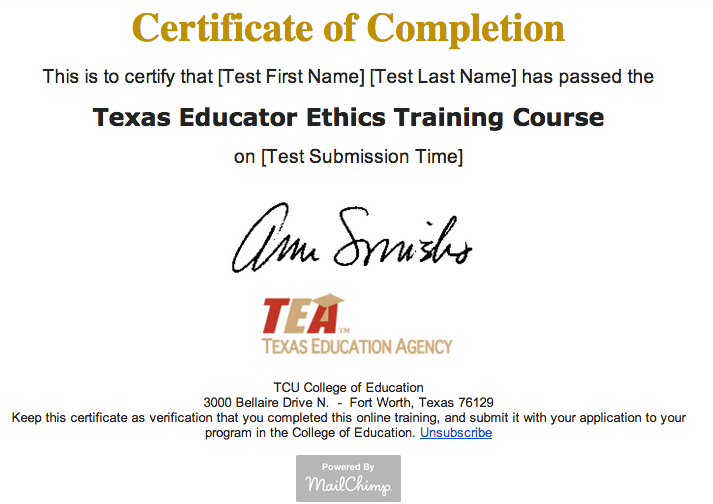
The form that is mailed to each person in your spread sheet will look something like the screenshot below. Notice, the person's e-mail client may strip out some of the formatting, such as fonts or colors. The details at the bottom of the merged document were added from the Email Info tab in the MailChimp panel. Also, the merge fields in the actual e-mail will not have brackets.

_Test__Texas_Educator_Ethics_Training_Course_certificate_-_curbyalexander_gmail_com_-_Gmail

And there you have it. Yes, it is pretty involved, but not much more than doing the same thing through SoftChalk or iSpring or any other eLearning tool, and it is totally FREE! This method could be used to give students survey or test results with feedback, digital badges, or progress reports. I should add one final word, which is that there will be some tinkering along the way. Each tool I presented here has a learning curve, and unless you have used mail merge in MS Word before, this will take some patience and repetition. Coming from someone who has done this using just about every possible method and tool, this process is pretty slick once you get used to it.

So, what tools do you use for this type of learning object? Is there a step I am missing or an easier way to do this? Let me hear from you.

Presenting with LiveSlide

I am always on a quest to find better ways to control my content during class meetings with my iPad. I have tried just about everything, from mirroring with Airserver to SlideShark, and nothing has quite done what I want. Either the tool is too unpredictable (Airserver) or it is too narrow (SlideShark), so I continue to keep my eyes peeled for ways to present my lectures while mobile in the classroom.

The best solution I have found so far is LiveSlide, a simple browser-based tool that lets you remotely control slides from any device. Teachers can use it as I do, to project content to the class while controlling it from a mobile device, or they can share the slides with their students and have them follow along during class. Students can also take notes on the slides for themselves, and the tool has a few interactive features for questioning and quizzes. I have not used many of these features, but I plan on it in the coming weeks.

LiveSlide is incredibly easy to set up. Since it is browser based, there is no app to install. Educators who sign up with their school e-mail will be automatically upgraded to the Elite account for free.

Once your account is set up, you can either create presentations from scratch or import them from your computer or Google Drive. Obviously, I use the last option since I typically create my presentation with Google Slides anyway. I have imported approximately 20 presentations so far, and I have not had so much as a hiccup during the process.

Students can view slides using one of two options. If they want to simply view the slides, they can join remotely using an access key. The teacher can decide whether or not the students can advance the slides on their own or if they must view them at the teacher's pace. The teacher can add quizzes and polls for students to answer, and students can submit questions while the teacher is presenting. I typically log in from my iPad then join the presentation from whichever computer is connected to the projector.

If students want to make a copy of the slides for themselves, they can pay a small account fee and be added to the course. All slide decks for that class will show up in their account, and they can take notes directly on the slides. I have not used this option, so I cannot verify how the students takes notes (writing on the tablet screen vs. typing). I think this will be a great feature when I begin to use it.

My favorite feature of this tool is that teachers can quickly add content and blank slides to a deck while they are teaching. You can add a YouTube video, take or import a picture, or add a blank slide to draw a diagram. I have already surprised myself a few times by drawing impromptu diagrams or importing a picture for everyone to see. This is a feature not available on any other web-based tool I have used.

There are a few limitations to LiveSlide that I hope will improve over time. For one, there are shape tools (circle, square, and line), but there is no way to move the objects around once they have been added, and I can't figure out how to delete them. I don't use this feature much, but I might if it was more responsive. Also, sometimes the tools disappear from the page if my iPad goes to sleep. I have to reload the page for the drawing tools to come back, which can be a little distracting while I am teaching. If I don't draw attention to myself, I doubt the students know what I am doing. :-)

Overall, I have to say I am quite impressed with this little tool. The team that created and maintains this tool is very responsive (hint, hint ... read that last paragraph). You can learn more about LiveSlide from their YouTube channel, which I plan on viewing carefully in the future. I hope to use more of the features in the near future and write more about it.  Keep up the great work Atlas Learning team.

*Note: There are a few tools on the web that use the name LiveSlide. Make sure you look for the one in the Atlas Learning toolkit. There is also a social network called Liveslide, but that is not something I am interested in at this point. :-)


Outsmarting the LMS: Creating Drag and Drop Folders

Update! Since posting this several months ago, Google has disabled embedding a Google Site. It's nice to know my Technology Ninja skills are being noticed (which is the exact opposite of what a ninja actually wants to do). I will leave this tutorial in case Google decides to start playing nice again.

Software developers must have a really distorted view of how professors use their time. Maybe they think we teach a few times per week and spend the rest of our time playing golf or drinking coffee while we complain about students. Maybe they think we enjoy spending hours each semester staring at progress bars while our files upload. Who knows. What I do know is that over the last 10+ years in higher education, I have developed a love/hate relationship with every LMS I have been forced to use. I love them because it is the best way to communicate with my students. When they want to know something, this is where they look first. I can post grades quickly, give feedback on their work, and create a safe place to share information.

I also hate the LMS because most of them are outdated, not very attractive (though that is not really such a big deal), and require redundant work from semester to semester. My goal the last few years has been to outsmart the LMS and find ways to work efficiently despite its limitations. I will spread these ideas out over several posts, which may take me several weeks to work through. The first topic I would like to address is creating drag-n-drop folders for documents and other media.

Step One: Creating Folders in Google Drive

The first step is to download and install the Google Drive desktop app. This is a pretty easy step, and the program runs unnoticeably on your computer. Once you have this installed, it will sync your Google Drive from the cloud to your computer. Anything you create from the computer (folders, files, etc.) will also be instantly synced to the cloud. I like to stay organized, so I created folders for each class, and then created folders within each class folder for the different things I would be sharing with students. This includes assigned readings, PPT files, assignment descriptions, etc. I already had some of my files ready for the new semester, so I copied them into the appropriate folders.

Step Two: Embed Folders into Google Sites

This is the step that might be a deal breaker for some people. As you may know, you can share a Google Drive folder with anyone with the link, which is a pretty handy feature when you want to share a bunch of stuff that might exceed the e-mail attachment limit. Unfortunately, Google has blocked the folder view in Drive from being embedded using the iframe tag in HTML. If you do this, you will be met with a blank box in the middle of your webpage. The only way to embed dynamic content from a Google Drive folder is to embed it in a Google Sites page. Sites has a widget for embedding an entire folder. So, for every folder you want to share with students, you will have to create a webpage for that folder. In order to keep myself organized, I structured the Google Site exactly like the folders in Google Drive. For example, I created a page for each class, then I made a page under that page for each folder I want to share. This took some time, but I should only have to do this once. I can always make more pages and folders, but the basic structure is there.

Step Three: Embed the Google Sites Pages

The final step is pretty straight forward. You do not need to know a lot of HTML to embed the Google Sites pages into your LMS. My institution uses Pearson LearningStudio, which allows me to directly edit the HTML. First, I created a tab, or Unit as they call it, for each folder. I then used the following code to embed the webpage on that tab:

<iframe src="http://www.somepage.com" width="100%" height="1000"></iframe>

You may need to adjust the settings of your Google Sites page so the embedded folder will stand out, but that is an easy fix. It should look something like this:

Crit_Investgatn_Teach_Learning_040__Alexander_

The beauty of this system is two-fold. First, any time I want to add or delete files from a folder, I just do it from the Google Drive folder on my computer and the changes are immediately synced anywhere the folder is embedded. I can also edit files and the changes are immediately synced. Second, this code is preserved anytime I copy a course to a new semester. So, I only have to do this once and all of my content follows.

What hacks have you come up with to make the LMS easier to deal with? I would love to hear your ideas.

All In: The New LMS

Today I attended a presentation sponsored by Apple about the changing role of mobile technologies in higher education, particularly colleges of education. This is of particular importance to my college right now because we are beginning to talk a lot about how and why to use different types of technology in our courses. Many faculty have been using technology for many years in their courses, but we are starting to see a shift in the role of technology in terms of how students access and use information. The presentation today, given by John Landis, Ph.D., was very much in line with the conversations I have been having with some of my colleagues over the past few months.

I will be honest, Dr. Landis' presentation was impressive. He is a great storyteller and is current on the trends and predictions sweeping through both K-12 and higher education. He understands that technology has traditionally been used to help teachers do what they've always done more efficiently or faster. He knows that students these days can get the same content traditionally transmitted from the instructor on any device, anywhere, at any time. And it's usually a lot more interesting. None of this was new to me, but it was still delivered in a fresh and relevant way. Landis presented a blend of theories, examples, and demos, primarily from his MacBook and iPad Mini, and the technology worked like a champ. He mirrored his iPad display using an Apple TV, and could switch pretty quickly to his MacBook Air to demo other programs. As a pretty heavy tech user, I was impressed that he was able to change speeds in so many different ways without so much as a hiccup.

What this presentation made very clear to me, however, was something I have been mulling over for quite some time. It is this idea that in order to fully leverage the benefits of one device, you must fully employ all of the devices in that particular ecosystem. In this way, Apple is actually becoming a device-based LMS. Just like Blackboard or Moodle have a suite of tools under the hood, Apple has an array of powerful tools that can really change the way teachers and students approach learning. The catch, however, is that one must buy in to the whole ecosystem in order to really see these benefits. For example:

  • I can create a customized, multimedia iBook on my MacBook for free, but it only really handles Mac-based media (.mov, Keynote, Pages, etc.).
  • Only my students with an iPad can download the multimedia version of the book and get the full benefit. Students running Mavericks can also read the book on their Mac, but students with Android or Windows devices are left behind.
  • I can mirror my iPad to my MacBook using AirServer, but it's not stable and does not work over my schools WiFi. If I want to really mirror my iPad, I need an Apple TV.
  • I can sync content across devices with a variety of tools, but the only way to sync ALL of my content is with iCloud, which is only for Mac.

The point is, each tool Dr. Landis showed us does amazing things. I want to try everything he showed us (except for the stuff I am already doing ... I want to keep doing it). But the only way to leverage the capabilities of each tool is to use it as part of the Apple Ecosystem (a term he used repeatedly). Apples are meant to work with other Apples, and there is really no motivation to make them work with Android (Google) or Windows. My workarounds, as I have found, are much more complex than the typical tech-using teacher is willing to mess with. I have found a way to teach from my iPad without using AirServer, which is a pretty awful replacement for an Apple TV. I use Google Docs to host and share course files, which works pretty well most of the time, but it's not as slick as content aggregated in an iBook. I have founds ways to do the things I want to do, but it's always a little more work when I am doing this across devices and outside "the ecosystem."

My take-away message is that Apple, Google, and Windows really are trying to create a system, and already have, where users must be "all in" in order to reap the benefits of their technology. More than ever, their tools only really play well with their own family members, and it is becoming increasingly difficult to lead a balanced digital life across platforms. With the exception of a few apps like Evernote or Google Drive, content on your device stays on your device.

I have no idea which ecosystem TCU will join, but I think they will eventually need to decide. These companies, which control the market, are leaving us very little choice otherwise.

Lecturecasting with a Bamboo

I recently got a question from a teacher about recording mathematics explanations using a Bamboo from Wacom. I have never used a Bamboo before, but I know people who have and I've seen other tablets like it, so I knew what this teacher was asking. When using a Bamboo, you project your computer on the screen using a digital projector, and the tablet is essentially a big mouse pad that lets you draw or write with a stylus. I have used similar tools before, and there is no projection on the tablet itself. You can just see your marking on the computer or projector.

Since the computer is the "brains" for the Bamboo, rather than an app on an iPad or other tablet, Bamboo users must use a program that runs on their computer. To my knowledge, the are not many computer programs that function as a whiteboard AND let you record your explanation. One would have to use a whiteboard app concurrently with screencasting software. This may become more trouble than it's worth, in my opinion. There is, however, a web tool called Educreations that works as a whiteboard that records pen strokes on a virtual whiteboard. The developers really push the iPad app, but there is a web component to it as well. I have used it with my students, and it works pretty well when there is no iPad available.

Using this tool, the teacer would project the browser page using the computer, and the Bamboo would be the writing tool. I wanted to walk myself through the process and recorded a demo, seen below (Note: I am not using a Bamboo; rather, I am remotely accessing the screen from my computer on my iPad using SplashTop. The iPad is acting like a Bamboo ... complicated, I know.)

The teacher to whom I was explaining this process bought his own Bamboo and teaches in a school devoid of many technological tools other schools have access to. My goal was to point him to something free that offered most of the things he wanted to do. Conceptually, this teacher understands the value of digitally recording complex explanations to students. He can go back and revisit old problems without having to rewrite them on the board, and since the entire explanation is recorded the students can watch it later when they are working independently. I tip my hat to teachers like this who catch a vision and seek out information to make it happen given the resources they have access to. iPads and other tablets are slick, trendy, and honesty, quite powerful, but they are not the only way to implement innovative teaching strategies with technology. No matter what the tool, there is no replacement for persistence and creativity.

Mission Control

I have always been one of those teachers who likes to show a lot of stuff on the screen. Before projectors, I displayed graphs, charts, images, and graphic organizers using a TV or overhead projector. I have always loved supporting what I have to say with visuals. So, it should come as no surprise that my computer, or any computer, is a necessary resource for my teaching.

I also like to switch back and forth between media. I am that guy who always has about 10 tabs open in a browser, and an addition 5 programs running on my computer. I switch between slides to documents to video to applications. I'm sure this drives my students crazy, but they get used to it. One thing I never got used to was being trapped behind my computer while I teach. I am definitely not one of these roam-the-room types, but I don't like to stand behind my computer and constantly have to look down at my screen. Since I utilize far more tools than just PPT, the little clicker thing never really worked for me. What I have always wanted is a miniature control panel that fits in one hand and allows me to switch seamlessly between apps and media, and even mark up that media for emphasis.

Well, during the Fall semester this capability literally fell at my doorstep when my department bought me an iPad. I had always wanted to use an iPad, but I didn't want to spend the money. I tend to be a late adopter when it comes to new devices. Anyway, I got the news from my dean that I would be getting an iPad, so I began researching ways to use it as a mission control for teaching.

Mirroring

My first task was to figure out how to mirror my iPad on the screen of my MacBook Pro. I discovered there are basically two ways to do this. You can use the iPad as a remote desktop and control the computer using the device. I tried PocketCloud, Doceri, and Splashtop 2. PocketCloud never really worked for me. I would be logged in, but I would have trouble connecting my two devices. Doceri worked pretty well, and even allowed me to mark up the screen, but it cost money and I didn't really like trying to find things on the screen. Besides, I was far more interested in teaching from the iPad apps than I was using the programs on my computer. Splashtop actually works really well, and I was able to get it for free. However, it is still just a remote view of my computer, which is not what I want. I much prefer the interface and ease of use of the iPad.

To keep this short, I settled on AirServer to mirror my iPad on my MacBook. There are a couple of programs that do this, and I liked this one best after downloading a couple of demos. AirServer fools your iPad into thinking your MacBook is an Apple TV, so you can use the built-in AirPlay to wirelessly mirror your device. For AirServer to work, your MacBook and iPad must be on the same wireless network. My university is very strict when it comes to using the wireless network, so this kind of thing is blocked. I found out, however, that I can pair my MacBook with my iPad using Bluetooth, and it works just the same. The only hiccup is when I try to stream video from the iPad to the MacBook via Bluetooth. It almost always freezes, so I have started playing video files directly from the hard drive. Other than that, this is a great solution that has not failed me yet.

Apps

The next thing I had to do -- and I am still doing -- is find apps that enable me to enhance my teaching with the iPad. I mean, if there is no value added, then why spend $12 for AirServer and bother figuring out how to mirror the display? I did quite a bit of reading and researching different apps that do the things I want to do in my classes, and I have found a pretty nice set that I rely on regularly. Here they are by category.

Presentation Slides

  • SlideShark: Easy to import and sync from the cloud, and maintains animations and formatting
  • Explain Everything: A nice combo of slides and an interactive whiteboard. Also lets me record my talk and upload it directly to Google Drive or YouTube (which I have yet to do.) By the way, when I Google "explain everything," it gives me a definition for the word "everything." Now that's pretty funny.

Cloud Syncing

  • SugarSync: This lets me sync everything (that I want) from my computer to the cloud. I can then access it from the iPad and send it to just about any app.
  • Google Drive: This basically does the same thing, with the added bonus of displaying Google Docs, which I use a lot. This interface is also much better for images and PDFs.

Student Engagement

  • Socrative: This is a clicker app that still just blows my mind. I hope it stays free forever, but I'm sure it won't. I can send out quick polls to my class, both forced-response and open-ended. I can also create quizzes and exit tickets, and have the results e-mailed to me in a spreadsheet. I will probably write exclusively about this app later.

In order to demonstrate how this works, I have created a short video of how I move between apps during one of my class meetings. This is unedited, but you will get the point.

Guest Blogging in the U.S.A.

The following post is something I wrote as a guest blogger on Wes Fryer's popular blog, Moving at the Speed of Creativity. My contribution will be posted on June 21.

The satisfaction to be derived from success in a great constructive enterprise is one of the most massive that life has to offer.

-Bertrand Russell

The first time I remember “creating” something for a school assignment was in 3rd grade. Up until this point, what I remember about school involved completing worksheets at my desk, reading from various texts in front of the whole class, and being placed in groups based on my ability in math and reading. This all changed in Mr. Beaver’s class, my 3rd grade teacher.

Mr. Beaver involved his students in various activities and challenges, most of which required us to build something with materials we found at home. He would come into class one day and toss out some ambiguous statement as if it were a hook with a worm: “My daughter bought a kite this weekend, and it works pretty well. I wonder if she could have built a kite out of supplies she found at home. Nah, probably not. That’s too hard for someone her age.” This was just enough for a few of us to go home and try to prove him wrong. During the school year, we had several projects that involved creating things: electromagnets, dioramas, kites, maps. For a kid who liked making stuff anyway, it was a fun year in school.

This experience probably planted the seed in my mind that projects are a fun and engaging way to learn. As a teacher, I tried to implement several different projects throughout the year, and now I spend a fair amount of time helping other teachers design and implement student projects in their classrooms.

Most of the work I have done in recent years has centered around digital media: teachers helping students combine images, audio, video and/or text to express their learning through such products as digital stories, documentaries, podcasts, virtual museums and comics. More recently, however, I have been involved in projects that cross over from digital media to physical media, otherwise known as digital fabrication or desktop engineering.

The focus of this initiative, under the direction of Glen Bull at the University of Virginia, is to teach students to apply math, science, engineering and technology skills and concepts to real-world problems. Students create digital models of objects such as electrical circuits, windmills, and gears, print and cut them using special equipment, then construct the components into a physical object. This short video describes the process of digital fabrication.

The concept of creating virtual 3D representations of objects before creating the physical object is not new. Many of the things we use everyday - cars, homes, buildings, city plans, electronics, and aircraft - were first designed and tested in a virtual environment before the physical object was ever built. Similar to storyboarding in movies and game design, virtual models help designers test and troubleshoot their products without making potentially costly mistakes that waste resources. As teachers, we want our students to be problem solvers and identify areas for improvement early in a process rather than later.

An integral part of this initiative has been training teachers - both in-service and preservice - how to integrate engineering and fabrication activities into their existing curriculum. Our research has confirmed a line of previous studies that many in-service and preservice teachers, especially at the elementary level, lack confidence when it comes to teaching math and science. This can be a barrier when it comes to encouraging teachers to create engineering design projects for their students. In response to this problem, we have been replicating engineering design projects being done with 4-5 grade students in Virginia with preservice teachers in North Texas.

If you are interested in reading examples about digital fabrication in a teacher education course, I have provided a few for you here:

The University of Virginia also has a wealth of resources on this topic, which can be accessed for free on the Make to Learn website. Most of these activities do not require a Silhouette cutting machine and have been successfully implemented in some classrooms with nothing more than scissors. I have also found some excellent activities at robives.com, but I have yet to try any of them with students or teachers.

My hope is that sharing some of the work being done in the area of desktop engineering with a larger audience will generate some interest in doing this type of work in the classroom. This initiative is in its infancy, yet it has already attracted quite a bit of attention and buy-in from several school districts, universities and the National Science Foundation. The need for our students to be creators, thinkers and innovators has never been greater, and there seems to be no better way to foster these qualities than to engage students in activities that require creativity, thinking and innovation. Students already have a reputation for being massive consumers of digital media and other technological innovations, and they are one of the largest groups to create and share digital content. Now, with the emergence of desktop engineering we have the resources at our fingertips to help them discover the relationship between virtual and physical media and further explore what it means to play with media.

Implementing Digital Fabrication

As I mentioned in my last post, there are a lot of aspects of digital fabrication that I really like. Students being able to design, create, evaluate, re-design and re-create objects that they conceptualized on the computer. Students being able to physically hold something they designed in a virtual environment. There are many elements of this kind of teaching that represent many of the hopes people have had for infusing technology into teaching and learning: direct application, real-world importance, creativity, etc. Until recently, most of my experience designing and fabricating objects had been done in my office on my one machine that is connected to my computer. There was no waiting for other people, no transferring files from one computer to another, no having to think about how and where to save files so I could resume my work at a later time. In the back of my mind I knew that the experience I had fabricating objects would be much different than the whole-class experience my students would have, and there were several technical aspects of this process I had not anticipated until I released it into the wild with my students.

I had some ground rules for myself when deciding how to introduce this activity:

  1. I wanted to give the class 1-2 authentic tasks to do. I did not just want to just have the students using the software for the sake of using the software. That has never turned out favorably for me.
  2. I wanted them to be able to finish in one week. That means one class meeting for one section and two for another.
  3. I wanted them to have fun and like what they are doing. This all gets back to my belief (and that of many other people) that one way to change attitudes toward technology is to provide people with engaging, meaningful and yes, fun activities that include technology. People, teachers in particular, tend to abandon technology because they have had bad experiences with it.

So, I set out to design an activity that met these criteria. I had the students complete these activities and submit their work when they were done. The first activity was used to introduce the software (no printing or cutting involved), and the second activity was for application. Overall, my students were very gracious and rolled with the punches. They seemed to like the second activity more than the first (Really!?!), and though I have no data to support my claims, I truly believe they understand digital fabrication more than they did after reading an article and watching a video. Here are my reflections (both technical, pedagogical and philosophical) from the experience.

  1. You have to print from the same computer you will use to cut the shape.  If you print from a computer that does not have a Silhouette connected to it, the software will put the wrong orienting marks on the paper and it will be useless for cutting ... unless you want to cut it by hand.
  2. The trial version of the software does not let you save your work. You must have a licensed version to save a project on one computer and open it on another.
  3. The printing and cutting step of this process is a bottleneck. I have 24 students in each class. They worked in groups of 3, and I brought 2 fabricators to the lab.  Under ideal conditions, everything went pretty smoothly. As soon as there was a hitch, and there were a couple, the line got a little backed up.
  4. The more fabricators you have, the better. However, the trade-off is that the more fabricators you have, the noisier your classroom will be.
  5. I received a couple different versions of this comment, "I have a hard time envisioning myself doing this activity with my class." It's hard to situate an activity within an instructional context AND create obvious connections to other instructional contexts. When you give preservice teachers a task, they tend to focus on the task. A seasoned teacher may do a better job of seeing those connections because she will have more applied experience than a novice teacher. In other words, I could have done a better job of facilitating what Salomon and Perkins call high-road transfer. I think requires some application and reflection, which we didn't really do.
  6. Related to the previous observation, there needs to be more emphasis on creativity in teacher education programs. Rather than being a thing a person either has or doesn't have, I think of creativity more like a muscle that needs to be exercised in order to grow and stay healthy. The older I have gotten, the more purposeful I have become in my creative pursuits. As for my role in the creative development of my students, I think the best way to do this is for them to create a digital fabrication activity in their preferred content area. It's one thing to be able to do my activity. It's an entirely different level of creativity to be able to create a learning activity for a group of children. I may do this at some point.

Overall, I would say this was a good activity for my first attempt at a new concept and new technology. I have a completely different vision for how this will look the next time I do it, which is evidence of learning on my part.

Knowing where the pitfalls are

When I was in college, I took a semester away from classes to live in Ecuador with a friend of mine and completely immerse myself in  an unfamiliar country and culture. Most of my adventures were unplanned, such as getting on the wrong bus, ending up in some unfamiliar place and trying to get back home alive. Those days were fun and made the trip seem less like real life and more like a movie. Some of my adventures were planned, such as going to the jungle or climbing on of Ecuador's many volcanoes. The most beautiful volcano, El Cotopaxi, particularly held my fascination because of its massive beauty. One day I remember telling my host family that I was going to climb El Cotopaxi, which was only a few miles from their family's dairy farm. They tried to discourage me from doing this because of the stories they'd read over the years of inexperienced climbers (mainly from Europe) trying to climb without an experienced guide and getting caught in a crevasse. Their fear was not the climbing, the cold or the altitude, although these were all things to be prepared for. They were most fearful of the crevasses, and if you wanted to climb the volcano successfully you had to know where they were. I find this story particularly relevant to using technology in my teaching. Actually, if I am the one using the technology, I don't think too much about the crevasses because they typically only affect me and waste my time. Sometimes a certain tool won't work correctly in the middle of my teaching, so the students get to sit there and watch me try to maintain composure, but I have learned how to avoid those embarrassing moments pretty well. The tools I use, I know them well, and I take extra care in learning new tools. However, it's an entirely different story when I am teaching my students how to use a tool. I feel a lot more pressure to structure my instruction in a way so their time is not wasted or they don' t get needlessly frustrated. It's quite intimidating, actually. For example, I was just talking to someone about how to convert multiple scanned documents (JPEG files) into a PDF. I thought I had given pretty good instructions, but I forgot to inform them of a particular crevasse, and this person ended up accidentally deleting all of the scanned files. We were able to recover them, but that did little to calm the pure anger at me and the technology.

This story just reinforces to me what it means to be technology literate, and how difficult it is to know the ins and outs of tools in order to help novice users steer away from the major time drains. But it also reminds me that every bad experience just develops my cognitive complexity a little bit more and will help me teach it better the next time. So don't stay off the volcano. Get out there and have some fun, but don't forget to make a note of the crevasses. Someone else's time might just be at stake.

Is there such a thing as a toss-aside course?

I used to hear from students that my technology course was commonly regarded by their advisors as a class they should "just get out of the way early." I don't think the advisors were referring to my course specifically, but rather the required technology course in that program in general. The course is primarily taught by grad students, so there is  a new instructor every 2-3 years. I don't think the faculty members even try to keep up with who is teaching the class every semester, unless the grad student takes the initiative to meet the faculty. Most of my students enjoyed my class and would make comments about how much they learned. I think this is the case for most educational technology classes, where most of the students have never seen technology modeled well by their teachers or professors. Their expectations coming into the class are pretty low, and this isn't helped by the attitude held by most of the advisors that it is a toss-aside class. In some ways these pre-existing attitudes act as a barrier, but I think more often than not they created a perfect opportunity to blow the students' minds and help them completely reframe how they think about, and hopefully use, technology in the classroom.

Another common theme, beside the belief that they would have to endure my class until December or May, respectively, is that I was going to teach them how to do a bunch of stuff. I would always ask them at the beginning of the term what they expected to learn from the class, and their responses were almost unanimously, "How to make  a ... " or "How to use ... program." This is important, but I don't think I ever heard someone say, "I want to learn how to support learning in social studies (or any other content area) through technology," or "I would like to learn how to plan a technology-based lesson." Technology was typically regarded as the thing a teacher adds in at the end, throws in for a diversion or uses for his/her own productivity. This context is a fertile ground for discussions on student learning, content, teaching strategies, classroom management and student engagement. Students were so focused on the how question, they rarely considered the why question. Why should teachers use technology? Is this even the right question? Maybe a better question is, what do I want my students to learn, and what are the best resources I can use to help them get there? What would motivate my students to want to get there? What do my students learn on their own when there are no teachers, parents or grades in the picture, and how do they learn it? You can hardly ask a question like this, framed within the context of the 21st century, without mentioning technology. Clearly, there needs to be a change in the way technology is thought about and presented in schools of education, and I think a lot of programs are moving in that direction.

So, to answer my own question, no I don't think there is any such thing as a toss-aside course. The approach and delivery may need some work, but the content -- the big idea of technology's role in teaching and learning -- is just as important as it has ever been.